 You must be a member of the local Administrators
group to configure the BHCS Notifications module.
You must be a member of the local Administrators
group to configure the BHCS Notifications module.
Step 1 - Notifications Setup requires the installation of SQL Server Express or SQL Server.
You must be a member of the local Administrators
group to configure the BHCS Notifications module.
 This information is provided as useful tips.
SQL Server Express is a Microsoft product and is not supported by Barr
Systems Support. Please consult with your Database Administrator or IT
Support if you need further assistance.
This information is provided as useful tips.
SQL Server Express is a Microsoft product and is not supported by Barr
Systems Support. Please consult with your Database Administrator or IT
Support if you need further assistance.
SQL Server Express is available for download at no cost from Microsoft. You will need to create a profile, so that you can login to download the software. The Download Site is: http://www.microsoft.com/en-us/server-cloud/products/sql-server-editions/sql-server-express.aspx
Select the SQL Server edition that includes Tools in either 32 or 64 bit, depending on the OS platform you are installing on. The Tools edition includes Management Studio Express, which provides a graphical user interface to the SQL database.
Note: Installing SQL Server Express on the BHCS server is optional. If you prefer to use a SQL Server Instance already installed on another Server, work with your Database Administrator to configure the necessary database and tables needed to support the BHCS Notifications Service.
To configure BHCS Notifications you will need to know:
a) The Server/ Instance (e.g. <servername>/SQLEXPRESS)
b) The Database Name (e.g. BHCSMessages)
c) Authorized SQL account that can read/write to the Database
If you are running SQL Server on the BHCS Server, first create the database:
a) Start Microsoft SQL Server Management Studio
b) From the Object Explorer pane, right-click on the Databases Folder and select New Database...
c) Fill in the Database name field with the name for the BHCS Notifications database (e.g. BHCSMessages)
d) Click the OK button
Run the SQL script to create the BhcsMessage table:
a) The SQL script is located at C:\BHCS\Notifications\Create Bhcs Messages Table.sql on the BHCS Server. If the SQL Server is on a different computer, then copy the SQL script to the SQL Server.
b) Open the script file (Create Bhcs Messages Table.sql) using Microsoft SQL Server Management Studio.
c) On the Toolbar change the Available Databases drop down from master to the database you are using for BHCS Notifications (e.g. BHCSMessages).
d) Highlight the open script tab which will allow you to click on the !Execute icon to run the script.
Verify that the Commands completed successfully then expand the BHCSMessages database and verify that you created a table named dbo.BhcsMessage (note, you may need to right click on the database name and click refresh to see the newly added table).
Proceed to Step 2 - Notifications Configuration below.
Step 2 - Notifications Configuration: Go to Start | All Programs | Barr Systems | BHCS | Spool Window then select Tools\Notifications Config...
The Addresses and Groups section defines what type of alert notifications are sent and to which users or groups they are sent. The options are to Add, Modify, and Remove.
You must select the Enable
Notifications checkbox in order to actively use the Notifications
module.
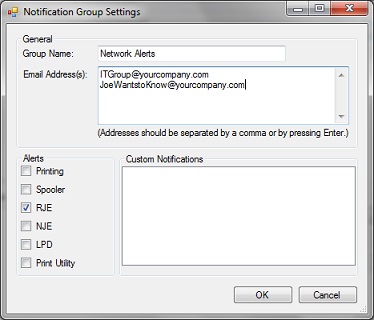
Add: To define a new address or group of addresses, click Add.
a) From the General area, fill in Group Name, Email Address(s), and select Alerts, then click OK.
The sample below shows a single user and group that will be notified by email whenever there is a critical level error logged by the RJE service.
Modify: To modify an existing address, select the specific address and click Modify.
a) From the General area, modify Group Name, Email Address(s), and/or Alerts, then click OK.
Remove: To remove an existing address, select the specific address and click Remove.
A Remove Notification Group window will appear; Click OK to remove.
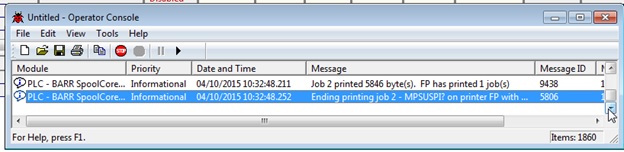
The Custom Notifications section is where configuration of non-critical Operator Console messages occur. A notification is sent when a document is received, when a document prints, or when a specific message is logged. View the Operator Console log to help determine the type of notification and parameter values that are needed.
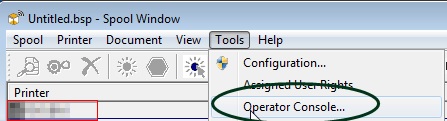
From the BHCS Spool Window, select Tools | Operator Console.
From the Operator Console message log, choose the information needed to create a custom notification (e.g. MessageID = 5806, Job name = MPSUSPI, when a job has printed)
Add: To define a custom notification, click Add.
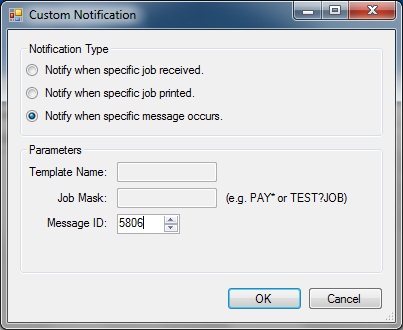
a) From the Notification Type area, choose a specific notify statement.
b) From the Parameters area, fill in any applicable fields (Template Name, Job Mask, and/or Message ID), then click OK.
The sample below shows notification when ending printing messages are logged to the Operator Console; by selecting the Notify when specific message occurs, and entering the Message ID (5806).
Example: If a notification is needed when Job MPSUSPI prints, then Notification Type would be Notify when specific job printed, and under Parameters you would enter MPSUSPI in the Job Mask field.
Note: Selecting Notify when specific job received, would send alerts that BHCS has received the job but not necessarily printed it. Also, once a Custom Notification is added, it is available within the Groups and Notifications interface.
Modify: To modify an existing custom notification, select a specific notification, then click Modify.
a) From the Notification Type area, change a notify statement.
b) From the Parameters area, change any applicable fields (Template Name, Job Mask, and/or Message ID), then click OK.
Remove: To remove an existing custom notification, select a specific notification, then click Remove.
A Remove Custom Notification window will appear; Click OK to remove.
The Settings Tab consists of four sections, Sender Settings, Email Templates, Excessive Alert Prevention, and SQL Database.
Click an option you want to learn more about.
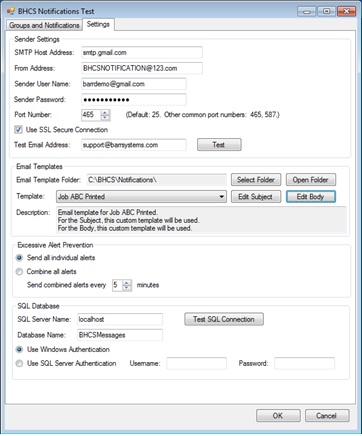
a) SMTP Host Address (e.g. smtp.gmail.com)
b) From Address
c) Sender User Name
d) Sender Password
e) Port Number
f) If using an SSL Secure Connection, select it
g) Enter a valid email address into the Test Email Address field. Once all settings are completed, click Test.
Note: If using GMAIL as the SMTP provider, GMAIL requires authentication against a valid GMAIL account and also requires an SSL socket. If the software is not configured properly you may get a pop up message indicating that there is a problem with sending an email. This is to aid in troubleshooting the connection.
Email Templates:Email templates provide the descriptive information that is sent in the email notification.
a) Email Template Folder field displays the default folder location. To browse the directory click Select Folder; click Open Folder to open the default location.
b) Use the Template drop-down to choose a specific template. To edit the template use the appropriate buttons, click Edit Subject and/or Edit Body.
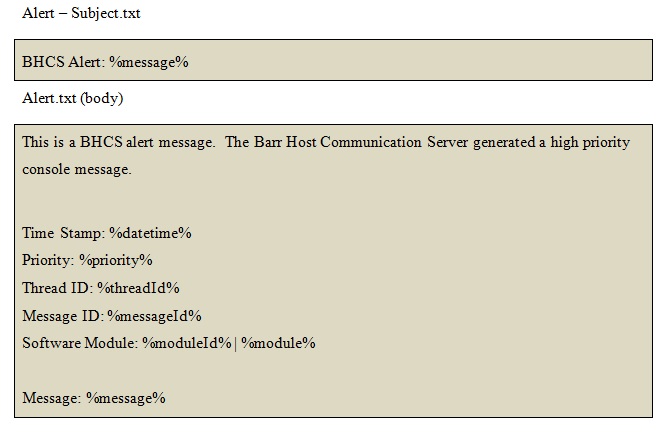
Each message that is logged to the database is comprised of: Time Stamp, Priority, Thread ID, Message ID, Software Module, and Message.
Within each email template are substitution variables used to populate the subject and/or body of the email. Below is an example of the default template for Alert - Subject.txt and Alert.txt (body):
Excessive Alert Prevention: This section allows you to configure how to handle multiple occurring events.
a) Select Send all individual alerts if every single alert needs to be sent individually.
b) Select Combine all alerts if alerts need to be held and released after a specific time period.
Example: The Print Utility service is configured to check a folder every 30 seconds, but that folder is not available due to the drive being offline. Selecting the Combine all alerts option and setting Send combined alerts every 5 minutes would queue these messages and instead of sending notifications every 30 seconds would instead queue the messages and release them at 5 minute intervals.
Note: When choosing to Combine all alerts, the first event is always sent immediately but subsequent events would then be held and released after the time lapse defined.
SQL Database: Enter the parameters for the SQL database server and database being used to log Operator Console events. Also, it is important to remember that BHCS expects the database table name to be BHCSMessage.
a) If SQL Express is installed on the BHCS server, choose the default setting localhost\sqlexpress as the SQL Server Name
b) Choose a Database Name or use the default setting BHCSMessages
c) Choosing Use Windows Authentication setting requires additional configuration:
The necessary changes will properly log Operator Console messages to the SQL database and send those messages via email
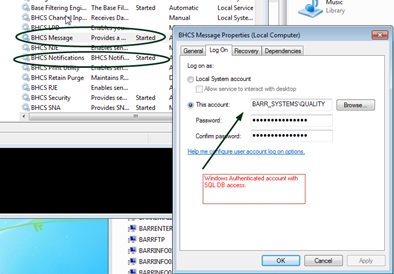
The BHCS Message service, which writes Operator Console messages to the SQL database, needs to have the log on account defined as a local Administrator
Launch the services manager (from the search bar type Services.msc, right-click and select Run as Administrator)
From the BHCS Message service, right-click and select Properties
From the LogOn tab, choose This Account then enter user (e.g. \Barr_Systems\Quality) and password then OK
From the BHCS Message service, right-click Restart (for changes to take effect)
Note: Restarting this service will stop and restart all BHCS services that are not set to disabled. Also, be sure to close the BHCS Spool Window prior to restarting the BHCS Message service. If you don’t, this service will not restart, because the Spool Window will automatically restart the BHCS Spool Core service before the BHCS Message service can restart.
The BHCS Notifications Service, which processes the SQL database messages, needs to have the log on account defined as a local Administrator.
Launch the services manager (from the search bar type Services.msc, right-click and select Run as Administrator)
From the BHCS Notifications service, right-click and select Properties
From the LogOn tab, choose This Account then enter user (e.g. \Barr_Systems\Quality) and password then OK
From the BHCS Notifications service, right-click Restart (for changes to take effect)
d) SQL Server Authentication should be used only when Windows Authentication is not possible.
SQL Server Mixed Mode Authentication must be enabled on the server
The username and password must be set when trying to establish a connection
e) Choose a specific number of days for purging messages... or use the default setting of 7 days
f) Once all settings are completed, click Test SQL Connection to test database connectivity
Note: If the software is not configured properly you may get a pop up message indicating that there is a problem with accessing the database. This is to aid in troubleshooting the connection.
The notifications.log file in the C:\BHCS\Log folder is where information about the notifications service is recorded. If there are problems accessing the database, or sending emails, open this log with notepad.exe, or an editor of your choice, to review messages pertaining to the BHCS Notifications service. You can rename or delete this log at any time and the service will automatically create a new notifications.log file if it cannot find one.
