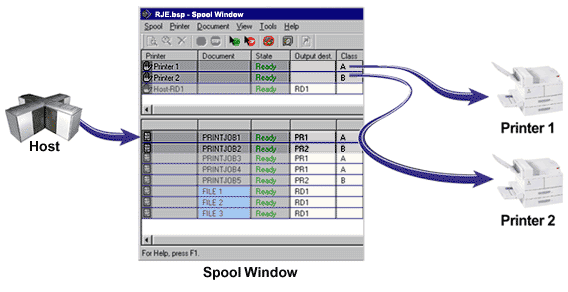
If you have followed the Getting started with BARR/RJE configuration steps, you have already configured the host and the software to receive jobs from the host to BARR/RJE. Jobs sent from the host will automatically appear in the document list of the Spool Window. When you configured BARR/RJE, each source device was assigned a class on the Device Properties dialog box. This value will appear in the Class column of the Spool Window for each job received from the host. It is also helpful to review the Output dest. column, which is populated with the destination stream (PR1, PU1, etc.). When you are sending jobs to the host, the Output dest. column is populated with RD1. This makes it easy to look at the Spool Window and determine the jobs destination.

If you havenít already done so, follow the steps in the Getting started with printers topic to configure a print device (for example writing to disk or printing to a Windows printer). To route jobs automatically, you must configure the class of each print device to match the class of each source device. To edit the Class field for the print device, double-click the Class column in the Spool Window and change the value to match the source device. For example, if you want the printer to print Class A jobs, type the letter A. If you want it to print jobs with Class A, B, or C, type ABC. When the jobs appear in the Spool Window, the jobs will be automatically routed to the desired destination.
When receiving RJE jobs, the NJHGXEQN - Exe. node field will be populated with the RJE Remote name specified on the RJE Description tab. This field can be added to the Spool Window.
If there are problems receiving jobs, refer to the Troubleshooting: Receiving jobs from the host topic.