Administration
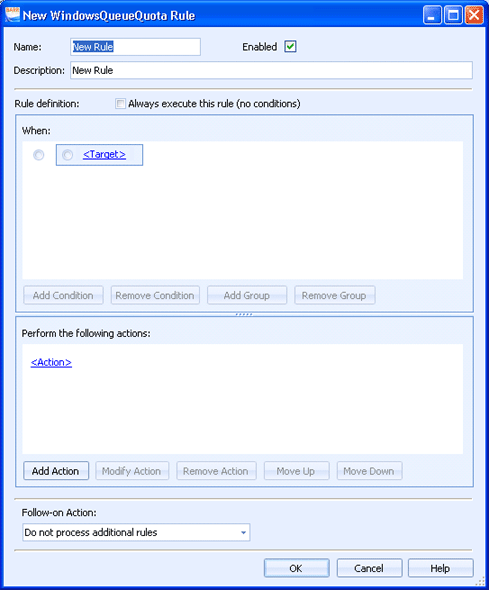
Use this dialog box to create advanced quota management rules for Windows queues. You can configure quota management rules to set up restrictions based on the type of document. Examples include disallowing color printing, requiring documents to be duplex, disabling print from certain applications, and so on.
Click an option you want to learn more about.

Enter the name of the quota management rule.
Use the check box to enable or disable the rule. This option is enabled by default.
Enter a description of the quota management rule. This will display in the Windows Queue Quota Rules Manager dialog box.
Always execute this rule (no conditions) – Use this option to apply the rule to all documents. This will disable the When box as no condition statements are needed.
The When box is used to create and manage the rule conditions. Multiple conditions can be created and organized into groups. A blue box is used to indicate a condition group.
To create a condition, click the <Target> link and use the list to select the appropriate condition. Click the Operation link to select the appropriate operation. Click the Value link to select the appropriate value. This will complete the condition statement.
You can select the condition statement and use the buttons below the box to add and remove conditions.
Select a condition radio button (inside the box) to enable the Add Condition and Remove Condition buttons for adding and removing condition statements.
Select a group radio button (outside the box) to enable the Add Group and Remove Group buttons for adding and removing groups. This will also enable the Add Condition button for adding a condition to the selected group.
The Perform the following actions box is used to create and manage rule actions.
To create an action, click the <Action> link and select the appropriate action type. You can create actions to do the following: disallow printing, perform cost accounting, route to destinations, set document owners, and set document state.
To create additional actions, click Add Action.
To modify an action, click the desired action link or click the area next to the link and click Modify Action.
To delete an action, click the area next to the link and click Remove Action.
To reorder the actions, click the area next to the action link and click Move Up or Move Down.
Select the action you would like to take after this rule has been processed. You can continue processing rules or select not to process any additional rules.