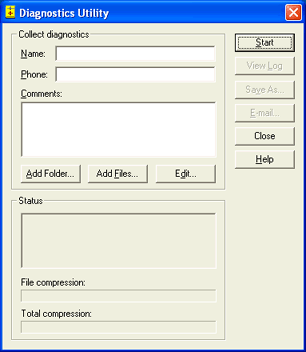
Open the Diagnostics Utility.

To run the Diagnostics Utility, complete the following steps.
Open the Diagnostics Utility.

In the Name box, type the name of the contact person. This is a required field.
In the Phone box, type the phone number of the contact person. This is a required field.
In the Comments box, type your assigned problem tracking number and a brief description of the problem.
Click Add Folder to select a folder (and all of its subfolders and files) to be included with the diagnostic.
Click Add Files to select individual files to be included with the diagnostic. Barr software configuration files and all trace files located in the \\Program Files\Common Files\Barr\Trace folder will be included in the diagnostics. Once the files in the trace folder are included in the trace, they will be moved to the \\Program Files\Common Files\Barr\Old Trace folder. If a file with the same name exists in the Old Trace folder, the existing file is replaced with the new file.
You can select additional documents to be included in the diagnostics file from the Spool Window.
Click Start. The status of the progress of the diagnostics being gathered will be indicated in the Status box. The name and location of the compressed Reduced the amount of space or bandwidth needed to store or transmit a block of data. Data compression is also called data compaction. .bct file will display, indicating that all diagnostics have been collected.
To view the details of the diagnostics, click View Log.
To save the BarrDiag.bct file to an alternate location, click Save As. This is useful because the BarrDiag.bct file is saved to a hidden folder by default.
Use one of the following methods to send the files to Barr Technical Support.
If you have Internet e-mail access, click E-mail to e-mail the file.
If you do not have Internet e-mail access, you can manually send the file.