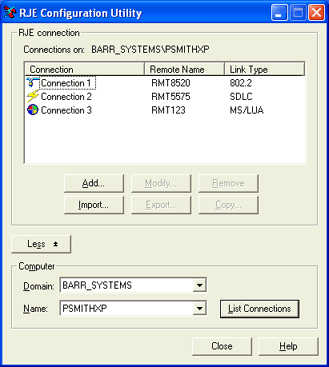
Use the RJE Configuration Utility to configure, import, and export RJE connections. When you add or modify a connection, the RJE Configuration Utility tabs display with connection-specific information. The RJE Configuration Utility consists of this opening screen and six configuration tabs: the RJE Description tab, Communication Link tab, Device Control tab, Forms tab, Commands tab, and the Connection Control tab.
You must be a
member of the local Administrators
group to operate the RJE
Configuration Utility. If you are assigned the Configure
- RJE user access right
on the computer to which you are trying to connect, but are not a member
of the Administrators group, the
RJE Configuration Utility will operate in read-only mode.
Users with the appropriate rights can remotely view or modify
RJE configurations. This could potentially cause a problem, because changes
can be made by multiple users at the same time. To ensure the correct
changes are applied, we recommend selecting one user to make configuration
changes for a specified connection. For
some configuration changes to take effect, you must restart
the host connection.
Click an option you want to learn more about.

The following shortcuts are available in the connection list: right-click to display a menu with connection-specific options, double-click to modify the connection configuration, and single-click twice to rename the connection. If there are no connections defined on the selected computer, the RJE connection box will display the following message: No connections defined.
Connections on – Displays the name of the domain and computer to which RJE is currently connected.
Connection – Displays the defined RJE connections. The symbol displayed next to the connection name represents the link type.
|
Symbol |
Link Type |
|
|
802.2 and HPR/IP |
|
SDLC | |
|
|
MS/LUA |
|
|
<none> |
Remote Name – Displays the name of the remote connection assigned on the RJE Description tab.
Link Type – Displays the defined link type selected on the Communication Link tab. The available link types are 802.2, HPR/IP, SDLC, and MS/LUA.
Add button – Adds a host connection. Enter the host connection name on the Add Host Configuration dialog box. After you name the connection, you can configure the connection settings. The connection name cannot contain the following characters: \ / : * ? “ < > |.
Modify button – Displays the configuration information for the selected host connection. You can also view and modify the connection by double-clicking the connection or right-clicking the connection and selecting Properties.
Remove button – Removes the selected host connection. You can also remove the connection by right-clicking the connection and selecting Remove.
Import button – Imports an existing host connection. A Browse dialog box will open and you can navigate to the desired file. This option is only available if you are running the RJE Configuration Utility on the local RJE computer. Refer to the Configuring BARR/RJE for upgrades topic for information on upgrading from the BARR/RJE DOS product.
Export button – Exports the selected host connection configuration to a specified location. You can also export the connection by right-clicking the connection and selecting Export. This option is only available if you are on the local RJE computer. If you modify an exported file outside of the RJE Configuration Utility, you might have unexpected results when importing it.
Copy button – Creates a copy of the selected host connection. You can also create a copy by right-clicking the connection and selecting Copy. The new host connection is automatically named "Copy of" the existing host connection. You can rename the copied file by single-clicking it twice or right-clicking the copy and selecting Rename.
Displays options for selecting the RJE computer and displaying the connections. Click More to display the options, click Less to hide the options.
You must be a member of the local Administrators group to operate the RJE Configuration Utility. If you are assigned the Configure - RJE user access right on the computer to which you are trying to connect, but are not a member of the Administrators group, the RJE Configuration Utility will operate in read-only mode.
Domain – Selects the network domain or workgroup that contains the computer to which you want to connect.
Name – Selects the RJE computer from a list of all computers on the selected network domain or workgroup. BARR/RJE automatically displays the last computer it was connected to, or by default, the local computer. In addition, the five most-recently used computers are displayed at the top of the drop-down list.
List Connections button – Connects the utility to the selected computer. All connections defined on that computer are displayed in the RJE connection box. If there are no connections defined on the selected computer, the RJE connection box will display the following message: No connections defined.