Open the FTP Manager.
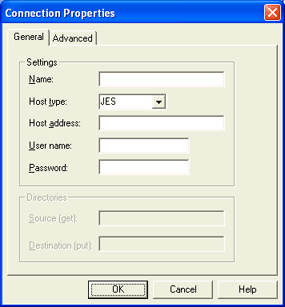
On the menu bar, select Connections | Add. The Connection Properties dialog box displays.
Select the General tab and complete the following steps.

This topic provides instructions on using the features of the FTP Manager. The FTP Manager connects to and transfers files between your JES FTP host or standard FTP server and the Barr Enterprise Print Server using FTP. Use the FTP Manager to configure FTP connections to send, poll, and get files.
You must be granted the Configure - FTP user access right to add, modify, or remove connections. You must be granted the FTP Manager user access right to poll or get files. See the Using the User Rights Configuration utility topic for more information.
Complete the following steps to add an FTP connection.
Open the FTP Manager.
On the menu bar, select Connections | Add. The Connection Properties dialog box displays.
Select the General tab and complete the following steps.

Type the connection Name. The connection name is limited to 8 characters and cannot contain the following characters, \ /:*?<>|. This is the connection name that will appear in the connection list.
When sending files to the FTP host, you will set the NJHGPRTR Output dest. field equal to the connection Name.
Select the Host type from the drop-down list. Select Standard if the host is a UNIX system. Select JES if the host is a JES system. The default host type is Standard.
Type the Host address, which must be unique and corresponds directly to the host name. The host address is required and can be an FTP or IP address.
If the host requires a user name to log on, type the User name. If a user name is not required, leave this field blank.
If the host requires a user password to log on, type the Password. If a user password is not required, leave this field blank.
If Standard is selected as the Host type, enter the path of the Source directory. When receiving files, this is the location on the host that the files will be retrieved from. You must type the entire path of the folder or the path relative to the FTP user home directory (for example, if your home directory is at \FTP\UserName, you can either specify \FTP\UserName\MySourceFiles or \MySourceFiles).
If Standard is selected as the Host type, enter the path of the Destination directory. When sending files, this is the location on the host that the files will be placed. You must type the entire path of the folder or the path relative to the FTP user home directory (for example, if your home directory is at \FTP\UserName, you can either specify \FTP\UserName\MyDestFiles or \MyDestFiles). The Source directory and the Destination directory cannot be the same location.
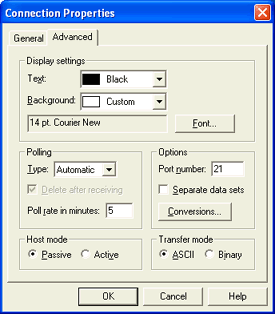
Select the Advanced tab and complete the following.

Under Polling, select the polling type from the drop-down list. Select Automatic to retrieve files automatically based on a time interval. Select Manual to manually retrieve files. The default polling type is Automatic.
If you select Automatic, specify the Poll rate in minutes. The poll rate specifies how often to poll and get files from the source. This number is in minutes and must be at least one. The default value is 5.
If you select Manual, select Delete after receiving to delete files from the source after the files have been retrieved. If this option is not selected, the same file may be repeatedly transferred from the host.
Under Options, enter the host's Port number. The port number must be from 1 through 65536. The default value is 21.
Select Separate data sets if you would like data sets to be sent as separate files. By default, this option is not selected.
Click Conversions to specify the format of incoming files using the Format tab and the Options tab.
Select the Host mode. A Passive host mode is where the client creates a session to receive data. An Active host mode is where the host creates a separate or new session to transfer data in response to a request from the client. The default selection is Active.
Specify the Transfer mode. Select ASCII to send and receive ASCII text. Select Binary to send or receive any type of file. The option you select depends on the host mode selected on the General tab. When using the JES host type, always select the ASCII transfer mode. When using the Standard host type, always select the Binary transfer mode. The default selection is ASCII.
If desired, specify the text color, background color, and the font, under Display settings. You can configure the window specifically for each connection.
Click OK to save the connection.
Complete the following steps to modify an existing FTP connection. The connection state should be Idle when modifying that connection's properties. The Connection list displays the connection's state.
Open the FTP Manager.
From the connection list, double-click the appropriate connection. You can also select the connection and select Connections | Modify on the menu bar, or right-click the connection and select Modify. The Connection Properties dialog box displays.
Modify the connection properties as needed on the General and Advanced tabs and click OK.
Complete the following steps to remove an FTP connection.
Open the FTP Manager.
From the connection list, select the appropriate connection.
On the menu bar, select Connections | Remove, or right-click and select Remove.
Complete the following steps to poll for files on the host.
Open the FTP Manager.
From the connection list, select the appropriate connection.
Poll for files by using one of the following methods.
Click the Poll button on the toolbar.
On the menu bar, select Connections | Poll.
Right-click and select Poll.
The console window lists the file names of any available files.
After you have added an FTP connection, you will use the FTP Manager to retrieve files from the JES FTP host or standard FTP server. Files can be retrieved automatically and manually.
Complete the following steps to configure a connection to automatically get files.
Open the FTP Manager.
From the connection list, double-click the appropriate connection. You can also select the connection and select Connections | Modify on the menu bar, or right-click the connection and select Modify. The Connection Properties dialog box displays.
On the Advanced tab, select Automatic from the Type drop-down list box.

Enter the Poll rate in minutes, which specifies how often to poll and get files from the source. This number is in minutes and must be at least one.
Click OK to save the settings. The specified connection will automatically retrieve files to the Spool Window in the interval specified.
Complete the following steps to manually get files.
Open the FTP Manager.
From the connection list, select the appropriate connection.
Get files by using one of the following methods.
Click the Get button on the toolbar.
On the menu bar, select Connections | Get.
Right-click and select Get.
Any available files will be retrieved to the Spool Window.
You can configure the display for each connection in the FTP Manager window by choosing the font, and specifying the text and background color.
Open the FTP Manager.
From the connection list, double-click the appropriate connection. You can also select the connection and select Connections | Modify on the menu bar, or right-click the connection and select Modify. The Connection Properties dialog box displays.
Select the Advanced tab.

Select the font. In order to maintain proper spacing in the console view, only fixed-width fonts can be selected.
Click Font. The Font dialog box displays.
Select the desired font, style, and size.
Select the colors.
Under Display Settings, in the Text drop-down list box, select the desired color for the console text, or click Custom to define a custom color.
Under Display Settings, in the Background drop-down list box, select the desired color for the console background, or click Custom to define a custom color.
Click OK.