 You need both the PRT.EXE and PRTMENU.EXE files regardless
of whether you run the utility in interactive or batch mode.
You need both the PRT.EXE and PRTMENU.EXE files regardless
of whether you run the utility in interactive or batch mode.The Barr spool PRT utility lets you copy files from the PC or LAN to the print spool directory and preset the spool header attributes for each file.
If you have the Barr PRINT370 option, you can use PRT to submit files with the S/370 format to the print spool. PRT automatically identifies S/370 files and creates the spool header in the S/370 format.
The Barr PRT utility is included with the Barr reference files. You can run PRT interactively from a menu or in batch mode from a DOS prompt. PRT gives you remote control over spooling criteria, such as form, class, and priority.
When you install the BARR/RJE software files on your PC, these PRT program files are copied from the Barr software disk to the C:\BARR\REF directory:
PRT.EXE
PRTMENU.EXE
SPOOL.CTR
If you want users on the LAN to use PRT, copy the PRT program files to a directory on a network drive.
You need both the PRT.EXE and PRTMENU.EXE files regardless
of whether you run the utility in interactive or batch mode.
Follow these steps to copy the PRT files to the C:\BARR directory:
Create the directory where you want to install PRT and change to that directory. For example, to install it on network drive F:, type these commands:
f:
md \barrprt
cd \barrprt
Copy the PRT.EXE and PRTMENU.EXE files to the new directory:
copy
c:\barr\ref\prt.exe
copy c:\barr\ref\prtmenu.exe
Finally, copy the SPOOL.CTR file to the new directory:
copy c:\barr\ref\spool.ctr

PRT uses control files to add spool headers to files before it copies them to the print spool. The control file specifies spool instructions such as the disposition of the file after printing, the form name to assign to the files, and printer commands like lines-per-inch, lines-per-form, and print lines-per-form. The default control file SPOOL.CTR is included with the Barr reference files. You can modify the default control file or create additional control files as needed. When you create additional control files, use .CTR as the file name extension to make the files easier to identify. You can use the PRT program or an ASCII editor to maintain control files.
To maintain control files with the PRT utility, follow these basic steps:
Run the PRT utility.
From the PRT screen, select Controls.
From the Controls menu, select Modify Controls.
On the Spool Control screen, change control file options as needed.
Exit and save your changes.
Detailed instructions for each of these steps follow.
 Type PRT
at the DOS prompt.
Type PRT
at the DOS prompt.
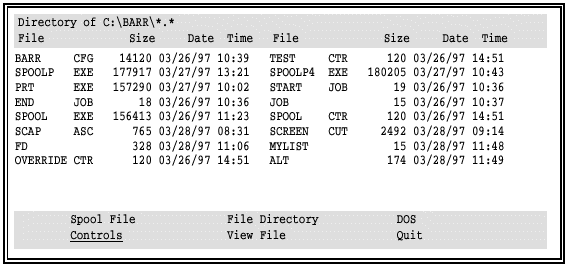
The PRT screen displays a two-column listing of files in the current directory.

If the words Spool File are unreadable in the command menu at the bottom of the screen, you need to exit PRT and type the mode bw80 command at the DOS prompt before you proceed.
The message in the bottom-left corner of the screen describes the action that PRT takes if you press ENTER while the command is highlighted. To select a command, use the arrow keys to highlight it or type the first character of the command name.

Select Controls.

Select Modify
controls.
The Spool Controls screen displays the default spool control values from SPOOL.CTR. Change the option values as needed. If you leave any of the option values blank in a new control file, default values from SPOOL.CTR are used.
Use the DOWN ARROW and UP ARROW keys to move between
fields. For fields that have selectable values, use the SPACEBAR to display
the list of choices.
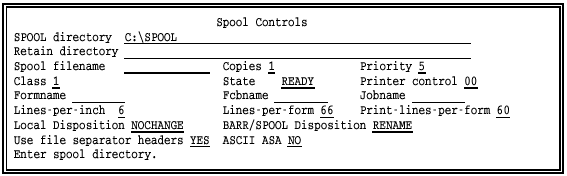
SPOOL directory
Directory in which the spool files are located. Include the drive name and full directory path. This directory should be the same spool directory defined in BARR/RJE.
Retain directory
Optional directory where a copy of the file is retained after the file is copied to the spool directory. Include the drive name and full directory path. When you specify a retain directory (and the file disposition is RENAME), a copy of the original file is put in the retain directory after copying to spool, and the file is deleted from its original directory.
This directory is different from the spool retain directory
discussed in Chapter 9. A
file is written to the PRT retain directory after the file is copied to
the spool directory. A file is written to the spool retain directory after
the file prints.
Spool filename
File name to use in the spool directory. If you do not specify a file name, the source file name is used. PRT adds the spool file name to the spool directory path to form the complete path name.
The file name extension consists of a period followed by up to three characters. You can specify a file name extension, or BARR/RJE can assign an extension. If the file name is followed by only a period (.), a blank extension is implied. If no period follows the file name, then a numeric extension automatically is assigned. BARR/RJE searches the directory for any files with that file name. If it finds a file with that name, the software assigns the numeric extension n+1, where n is the highest extension found. If it finds a file without a numeric extension, it assigns extension .001.
For an example of the automatic naming sequence, see File Name Extensions in section 10.5.
Copies
Number of copies of the file to print.
Priority
Indicates the print priority. Values range from 0 to 9, where 9 is the highest priority.
Class
Spooling class. Allows similar files to be grouped. BARR/RJE printers can process up to five classes at once. You can direct a file to a particular printer by setting the file class to a value assigned to only one printer.
State
Spooling state. Choices are READY and HOLD. If the file state is READY, BARR/RJE prints the file with no operator intervention. Files with a HOLD state will not be printed until the state is changed. Setting the state to HOLD gives the operator time to make preparations, such as changing the paper on the printer before the file prints.
Printer control
BARR/RJE printer control string selector. This hexadecimal field is an index to the Printer Control Data table for the destination device. (Each LPT, COM, or NET device has a separate table, as discussed in section 8.8.) The control string associated with this index code is sent with the file to the printer. Control strings are commonly used to set printer lines-per-inch and fonts.
Formname
An eight-character form name. This often indicates pre-printed forms paper that must be loaded in the printer.
Does not reference a form in the Edit Forms table.
Fcbname
An eight-character FCB name.
Does not reference a form in the Edit Forms table.
Jobname
An eight-character job name.
Lines-per-inch
Number of print lines-per-inch (usually 6 or 8).
Lines-per-form
Number of actual lines on the printer form. Includes top and bottom margins. For example, if the length of the printer form is 11 inches and line spacing is set to 6 lines-per-inch, the number of lines-per-form is 66.
Print-lines-per-form
Number of lines used for printing the form. Excludes top and bottom margins. Print-lines-per-form should be less than or equal to Lines-per-form.
For example, if Lines-per-form is 66 and Print-lines-per-form is 60, then the printer skips over the last six lines as a page margin. A common use of the page margin is to leave three lines on each side of the paper perforation when you use perforated paper.
Local Disposition
Disposition of the original file after copying into the spool directory. Choose from three possible values.
NOCHANGE – Leave the file in its original directory after copying to the spool directory.
DELETE – Delete the file from its original directory after copying to the spool directory.
RENAME – Copy the file to the PRT retain directory and delete it from its original directory after copying to the spool directory. The rule for automatic generation of numeric file extensions in the spool directory also applies to the PRT retain directory.
BARR/SPOOL Disposition
Disposition of the spool file after it prints.
RENAME – Copy the file to the spool retain directory.
DELETE – Delete the file.
Use file separator headers
Choose whether to generate header pages to separate print output.
Yes – Default. Generate file separator pages.
A file separator header page can be used to identify printed files. The job name can be included on the header page by entering an appropriate identifier in the Jobname field.
No – File separator headers are not generated.
ASCII ASA
A flag indicating whether to convert ASA carriage control to machine carriage control in an ASCII file so you can send it to an S/370 channel printer. (Requires the Barr PRINT370 option.)
NO – Do not convert ASA carriage control to machine carriage control.
YES – Convert ASA carriage control to machine carriage control. Conversion takes place when the spool sends the file to the printer.
To exit the Spool Controls window, press ESC at any time or press ENTER while the last field is selected.
You return to the PRT menu, while your changes to the options remain active. Next, you can save the active values to a control file.
Select Controls.

Select Save controls.

Enter the file name for the control file or accept the displayed name by pressing ENTER.
If you want these settings to be the default settings, you must name the control file SPOOL.CTR and put it in the same directory as the PRT program files (PRT.EXE and PRTMENU.EXE). When you start PRT, the utility searches for SPOOL.CTR in the current directory, and then it searches the directory containing the PRT program file. This allows each user to store control files with custom settings on their PC.
You also can create and maintain spool control files with an ASCII program editor, if you are proficient with the editor. See Table 25-1 for a list of control options and their maximum field lengths.
A sample control file created with an ASCII editor is shown below.
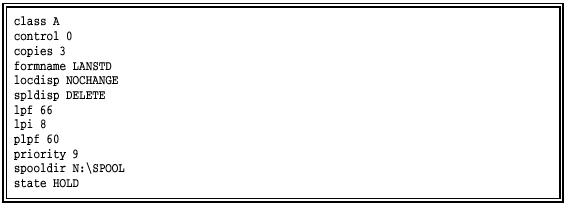
Follow these guidelines when you edit control files:
Specify only those values that will differ from the default values in the SPOOL.CTR file.
The format of each option is as follows:
keyword value
Separate the values from the keywords with one or more spaces or tabs. Enter only one keyword and its value on each line. When PRT reads each line, it checks for the keyword first and then its value.
You can specify the options in any order. You can use mixed-case type because PRT converts lowercase letters to uppercase.
Test your spool control files after you create them. If a line does not contain a valid keyword or it contains an invalid value, PRT ignores the line and displays an error message when you load the control file from the PRT screen or reference the control file in a PRT batch command.
 Use .CTR as the extension for all control file names to make
the files easy to identify.
Use .CTR as the extension for all control file names to make
the files easy to identify.
You can run the PRT utility in batch or interactive mode.
Batch mode allows you to spool files by typing a command at the DOS prompt.
Interactive mode lets you view files, change directories, and select files to spool from the PRT screen.
With either method, you can specify a control file to use and individual option values to override.
The PRT utility is too large to run interactively from a DOS
session in BARR/RJE, but you can run it in the batch mode from the DOS
session.
When you use PRT in batch mode, you can specify control options from the DOS prompt. You can use the default spool control file (SPOOL.CTR), specify a different control file, or override individual option values in a control file.
To use PRT in batch mode, type the PRT command at the DOS prompt, followed by the name of the file you want to spool and any control files or options you want to specify.
The format of the command is as follows:
prt myfile.txt [@controlfile] [option=value]
where
myfile.txt is the file to add to the print spool.
controlfile is the control file to use. If you do not specify a control file, the default SPOOL.CTR options are used. Precede the control file with the @ character.
option is the control file option to override. You can override as many control options as you like. See Table 25-1 for a list of control options. Only the first three characters of each keyword are required.
Table 25-1. PRT Spool Control Options
|
Parameter |
Description |
Maximum Length |
Valid Values |
|
ASA_CC |
Convert ASA to machine carriage control for ASCII files sent to S/370 printers |
3 |
Yes, No |
|
CLASS |
Class to be assigned to file |
1 |
A-Z, 1-9 |
|
CONTROL |
Printer control string to be sent with file |
2 |
Hexadecimal code |
|
COPIES |
Number of copies to print |
4 |
1-9999 |
|
DESTNAME |
File name to use in spool directory |
12 |
|
|
FCBNAME |
FCB name associated with file |
8 |
|
|
FORMNAME |
Form name associated with the file |
8 |
|
|
HEADERS |
Use file separator header page to identify printed files |
3 |
Yes, No |
|
JOBNAME |
Job name associated with file |
8 |
|
|
LOCDISP |
Disposition of original file after copying to the Spool directory |
8 |
Nochange, Delete, Rename |
|
LPI |
Lines-per-inch setting for printer |
1 |
1-9 |
|
LPF |
Lines-per-form setting for printer |
3 |
1-999 |
|
PLPF |
Print-lines-per-form setting for printer |
3 |
1-999 |
|
PRIORITY |
Priority to be assigned to file |
1 |
0-9 |
|
RETAINDIR |
PRT Retain directory, if original file is to be retained after copying to spool directory |
64 |
|
|
SPLDISP |
Disposition of spool file after printing |
8 |
Delete, Rename |
|
SPOOLDIR |
Spool directory |
64 |
|
|
STATE |
State to be assigned to file |
5 |
Ready, Hold |
These examples illustrate how you can use the PRT batch command to spool files.
This command adds the REPORT5.TXT file to the print spool by using the default control file SPOOL.CTR:
prt report5.txt
This command adds the SEPT.001 file to the print spool, sets the number of copies to 5 and the form name to CHECK, and uses the default values from SPOOL.CTR for all other options:
prt sept.001 cop=5 form=check
This command adds the file MYLIST to the print spool, sets the number of copies to 10, and uses values from the LISTING.CTR control file for all other options:
prt mylist @listing.ctr copies=10
When you run PRT interactively, it lists the current directory on the screen. You can change directories, view files, and assign control options before you copy a file to the print spool.
Type the PRT command at the DOS prompt.
The PRT screen displays:
The files in the current directory display in a two-column listing. Commands display at the bottom of the screen.
To select a command, move the cursor to the desired command or type the command’s first letter, and then press ENTER.
PRT commands are described below.
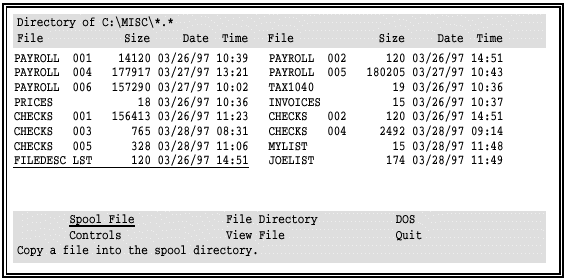
Spool File
Submit a file to the print spool using the current spool control options. You can select a file from the list or enter a file name.
Controls
Load, change, and save the spool control options. The SPOOL.CTR options are loaded by default.
File Directory
Change the file directory listing on the PRT screen. The name of the current directory displays at the top of the screen. When you select this command, PRT prompts you to supply the directory name and file name template.
View File
Display a file on the screen. You can select a file from the list or enter a file name.
DOS
Leave the PRT screen temporarily to go to the DOS shell. To return to PRT, type exit at the DOS prompt.
Quit
Exit the PRT program. When you select Quit, the PRT version number displays in the lower-right corner. Press ENTER to exit the PRT program, or press ESC to cancel.
In the simplest case, you just need to use the first two PRT commands to load a control file and submit a file to the spool. This example command sequence shows how you might use the first four PRT commands to submit a file.
Display a File Directory – Use the File Directory command to specify which directory to list on the PRT screen. The current directory name displays at the top of the screen.
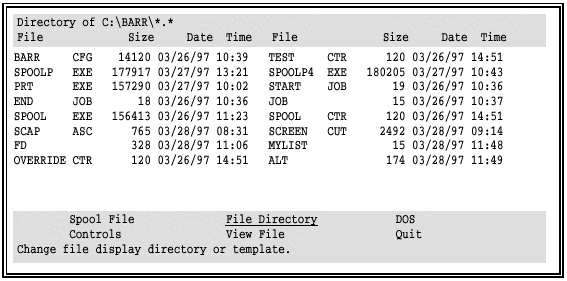
Select File Directory from the command menu.

Enter the drive and name of the new directory (in this case, C:\MISC).
To restrict the display to a group of files, you can enter a file name template. The default is *.* to display all files.
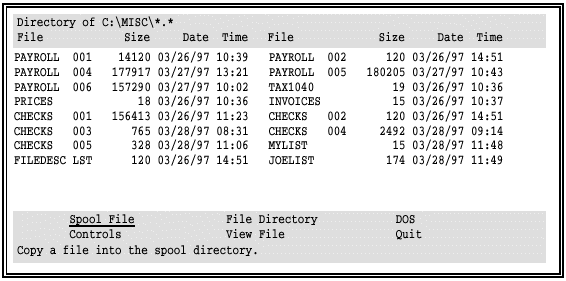
The name of the new directory displays at the top of the screen and the list of files is updated.
View a File – You can use the View File command to examine a file on screen before you submit it to the print spool.
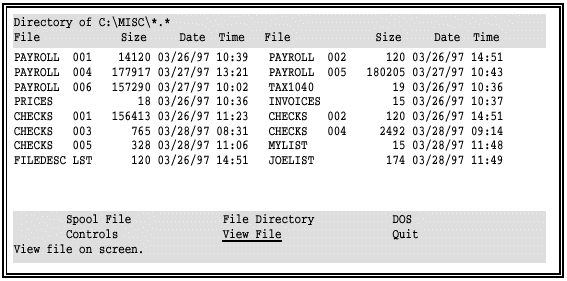
Select View File from the command menu.

Choose Select file from list.
The cursor moves to the file list portion of the screen.
Select a file (in this example, FILEDESC.LST) with the arrow keys, or press ESC to cancel.
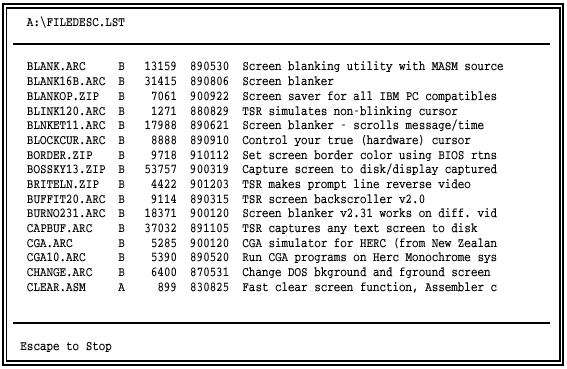
Use the HOME, END, PAGE UP, PAGE DOWN, and arrow keys to examine the contents of the file. HOME and END jump to the beginning and end of the file, respectively.
Press ESC twice to return to the PRT menu.
Load Spool Controls – The Controls command lets you load, change, and save options for spool control files.
Select Controls from the command menu.

Select Load controls.

Enter the name of the control file to use (for example, GREENBAR.CTR). The default file name is SPOOL.CTR.
After the controls are loaded, you can change them if you need to, as described in section 25.2.
Submit a File to the Spool – The Spool File command puts a file in the spool directory. It uses the spool control options you specified with the Controls command.
Select Spool File from the command menu.

Choose Enter filename.

Enter the name of the file to spool, or press ESC to cancel.
A message notifies you when the file has been spooled.
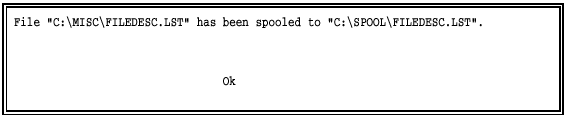
Press ENTER or ESC to return to the PRT menu.