The Barr print spool makes it easy to route files and manage print jobs. It operates like mainframe print spooling. Print files are organized in a print queue (a directory on the PC hard drive). The print spool automatically sends the queued files to printers or other destinations according to file selection criteria you specify, such as form name, class, and priority.
The print spool makes it easy to perform these tasks:
Receive files from a host computer or copy files from the network to the print spool.
Specify how many copies of a file you want to print. The print spool provides the best way to print multiple copies of a file. The software puts one copy of a file in the spool directory and the print spool sends the file to the printer the specified number of times.
Automatically preset or change file attributes like form name and priority as files arrive in the spool directory.
Route a file to one of eight different destination devices, such as a PC printer, network printer, or network directory.
Reprint an entire file or portions of a file after resolving a printer jam.
Save (or retain) a copy of a file after it prints, restore the file to the print spool if you need to print it again, and automatically purge the retain directory at regular intervals to free PC disk space.
Log print spool activity so you have a record of when files were printed, reprinted, deleted, or restored.
This chapter describes how to set up the Barr print spool. For more information about print spool features, applications, and operation, see Chapter 24, Print Spool Operation.
This section describes how the print spool uses file attributes, printer attributes, and device assignments to direct files to destination devices.
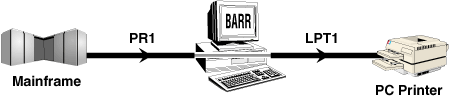
Suppose you want to write files from an RJE print stream to PC printers. If you do not use the print spool, the software routes all files from one source device to the same destination, as shown in Figure 9-1.
Figure 9-1. Without print spooling, all output from the PR1 print stream prints on PC Printer 1.
If you enable the print spool, you can route different files from one source device to different destination devices, as shown in Figure 9-2.
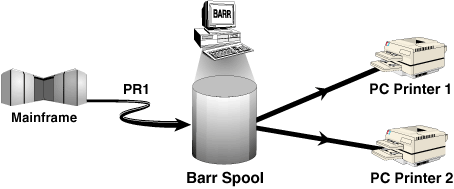
Figure 9-2. The print spool routes some files from the PR1 print stream to PC Printer 1 and other files to PC Printer 2.
To determine to which PC printer or other destination to route a file, the print spool matches file attributes to spool printer attributes and spool printers to device assignments.
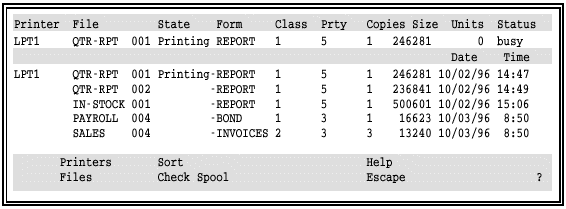
As each file writes to the print spool, the Barr software adds a spool header to the file. The spool header contains attributes that describe the file and how it should print. For example, the copies attribute indicates how many copies of the file the software should print and the form attribute indicates what type of paper the PC operator should load in the printer. The attributes for each file display on the Print Spool screen.
When you set up the print spool, you define spool printers and specify attributes for each one. A spool printer acts like a router. It directs files from the print spool to their actual destination. The software compares each file’s attributes to the spool printer attributes. When a file’s attributes match the attributes of a spool printer on the Print Spool screen, the software directs the file to the destination associated with that spool printer, as shown in Figure 9-3.
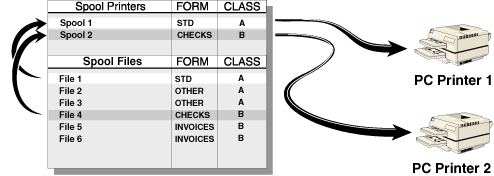
Figure 9-3. When a file’s form and class match a spool printer’s form and class, the file prints. In this example, Spool Printer 1 routes File 1 to PC printer 1 and Spool Printer 2 routes File 4 to PC Printer 2.
File attributes can originate from a variety of sources. For a complete list of file attributes and the possible ways to set them, see Appendix E. You can preset spool printer attributes from the Printer Initialization screen and maintain them on the Print Spool screen. You can assign spool printers to destination devices from the Assign Devices screen as described in section 10.7.

To set up the print spool, you must define the spool devices, specify the flow of files to printers or other destination devices, and assign file and printer selection criteria.
Follow these three steps to set up the print spool feature.
Enter the Print Spool Description options discussed in the rest of this chapter.
Assign source devices to
write to the spool directory (for example, assign PR1 SPOOL) from
the Assign Devices screen. See section
10.7, Assigning Spool as a Destination.
SPOOL) from
the Assign Devices screen. See section
10.7, Assigning Spool as a Destination.
 You can define
only one spool directory.
You can define
only one spool directory.
Finally, assign the spool
printers SPOOL1
to SPOOL8
to route files to the desired destination devices (for example, assign
SPOOL1LPT1) from the Assign Devices screen. See section
10.7, Assigning Spool as a Destination.
For more information about software features that affect spool setup or operation, see these sections:
Section 10.9, Options for Assign Devices
Chapter 25, Spool PRT Utility
Appendix E, Spool Header
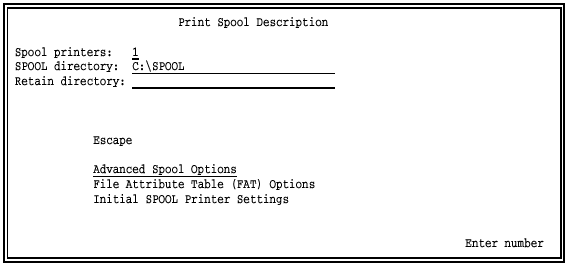
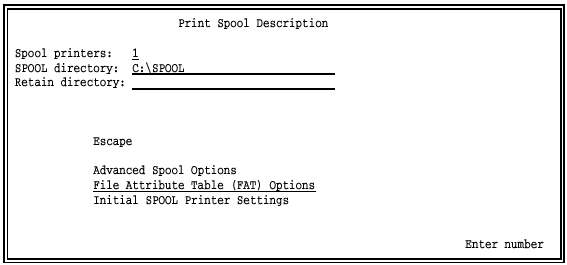
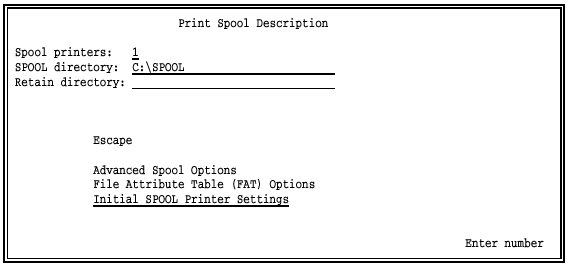
You can reach all the print spool settings from the Print Spool Description screen.
 From the Installation Description menu, select Print Spool Description.
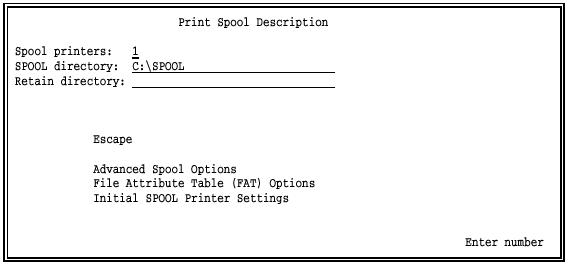
From this screen, you can specify basic spool options and display additional screens that contain more advanced spool options.
The first two options are required, but the third one is optional.
Spool printers:
Specify the number of spool printers that service the print spool. Spool printers route files from the spool directory to PC printers or other destination devices. Specify one spool printer for each destination device. You can choose from 0 to 8 spool printers. The default number of spool printers is 1. To disable the print spool feature, set this value to 0.
A list of spool printers displays at the top of the Print Spool screen during software operation. On the Assign Devices screen, spool printers display as the devices SPOOL1 to SPOOL8. See Chapter 10 for more information about assigning spool printers to destination devices.
 Performance Tuning: If you do not use the print spool
option, set the number of spool printers to 0. This frees PC memory and makes
it available to other software features.
Performance Tuning: If you do not use the print spool
option, set the number of spool printers to 0. This frees PC memory and makes
it available to other software features.
SPOOL directory:
Assign a name to the DOS directory that serves as the spool print queue. Files stored in this directory display on the Print Spool screen. The default directory name is C:\SPOOL. You might want to specify a directory on the network to enable users on the LAN to submit files to the spool directory. When you start BARR/RJE for the first time, the software automatically creates this directory.
In the Assign Devices list of destination choices, the print
spool device appears as SPOOL.
The name you assign to the print spool directory does not change the SPOOL
device name on the Assign Devices screen.
Retain directory:
An optional directory for automatically storing spool files after they print or you delete them. You might find it useful to save, or retain, a file after it prints in case you need to print another copy of it later. You can choose to retain all files or selected files.
The retain directory must have the same drive letter (for example, C:) as the spool directory, because the two directories must reside on the same logical drive or partition. When you start BARR/RJE for the first time, it automatically creates this directory.
A file’s disposition attribute controls whether it gets deleted or retained. If you specify a retain directory, all spool files are retained (the file disposition is set to retain) by default. If you leave the retain directory field blank, all spool files are deleted (the file disposition is set to delete) by default. You can use the disposition field on the Print Spool screen or in the File Attribute Table to override the default disposition for individual files or groups of files.
If you leave the retain directory field blank but you tell
the software to retain a file, the file will be saved to the root directory
(usually C:\) of the drive where the spool directory resides. Also, you
will not be able use the Restore feature.
If you specify a retain directory, you can use a separate Restore screen to manage the files stored in the retain directory. The Print Spool and Restore screens are described in Chapter 24, Print Spool Operation. The File Attribute Table is described in section 9.5. See section 9.4 for more retain options.
You can specify advanced options that affect print spooling. These options give you more control over spool display and operation.
From the Print Spool Description screen, select Advanced Spool
Options.
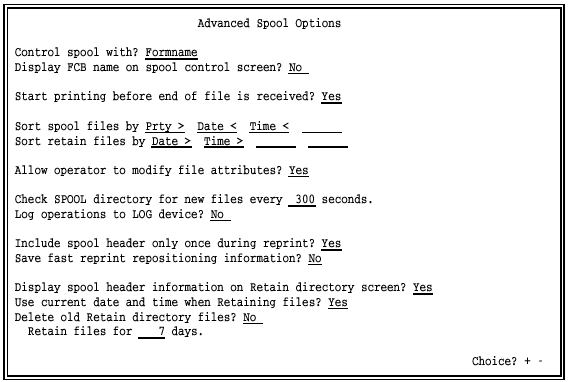
The options on this screen fall into three categories: spool options, reprint options, and retain options.
The options on the first half of the Advanced Spool Options screen control print spool operation.
Control spool with?
Choose whether the file form name or FCB name controls spool file printing. The specified file attribute must match the corresponding attribute on a spool printer before the file can print. The control name displays between the state and class columns on the Print Spool screen. This column is also called the spool control column. The control column heading matches your selection for this option.
Formname – Default. On the Print Spool screen, the control column heading is set to Form and the form name for each file displays in this column. Typically the form name indicates the type of paper the job requires. When the spool printer’s form name matches a file’s form name, and other spool criteria match, the job prints.
FCBname – On the Print Spool screen, the control column heading is set to FCB and the FCB name for each file displays in this column. Typically the FCB name indicates the job format, such as the number of lines-per-inch. When the spool printer’s FCB name matches a file’s FCB name, and other spool criteria match, the job prints.
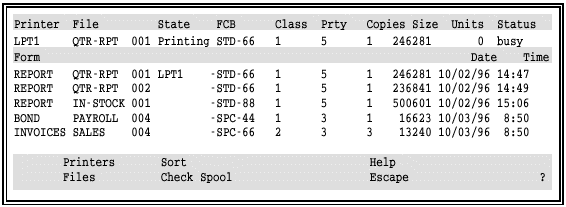
Display FCB|Form name on spool control screen?
You can display both the form name and FCB name on the Print Spool screen. The PC operator might find it useful to see both names. However, only the name specified by the previous option, Control spool with, controls spool printing. The value you select for the Control spool with option affects the wording for this option.
The display name appears in the first column of the Print Spool screen, immediately before the file name. This column also is called the display column. The display column heading matches your selection for this option.
No – Default. Only the name specified with the Control spool with option displays on the Print Spool screen. When a file prints, the printer name (for example, LPT1) displays in the first column and the word Printing displays in the state column.
For example, if you select Form name for Control spool with and set Display FCB name on spool control screen to No, the Print Spool screen looks like this:
Yes – Both the form name and FCB name display on the Print Spool screen. If you select Form name for Control spool with, then FCB is used for the display column heading. If you select FCB name for Control spool with, then Form is used for the display column heading. When a file prints, the printer name (for example, LPT1) displays in the state column.
For example, if you select Form name for Control spool with and set Display FCB name on spool control screen to Yes, the Print Spool screen looks like this:

In the first column, note the FCB column heading and the list of FCBs. In the state column, note that the name of the printer displays (instead of the word Printing) when the job begins to print.
If you select FCB name for Control spool with and set Display Form name on spool control screen to Yes, the contents of the display and control columns will be swapped, as shown on the following screen.
Start printing before end of file is received?
Specify whether the file starts printing after the entire file is received, or whether the file starts printing while it is being received.
Yes – Default. Printing starts without waiting for the end of the file to be received. This feature is especially useful for very large files that take a long time to receive, because the files will start printing much sooner.
No – Printing starts after the end of file is received. Use this method if the communications line speed is not fast enough to drive your printer at full speed. The print spool can drive the printer at its rated speed. If the communications line is slower than the printer, this choice prevents the printer from pausing to wait for more data from the communications line.
Sort spool files by ____ ____ ____ ____
Specify up to four fields for sorting files during print spooling. Files print in the same order that they display on the Print Spool screen. Spool files are sorted by the first field and then subsorted by the remaining three fields.
Follow these guidelines when you set the sort criteria:
Use the RIGHT ARROW key to move among the sort fields.
For each sort field, use the PLUS SIGN key on the keypad to select from the list of file attributes to sort by: Prty, Class, File, Size, Form, Date, or Time.
Set any unused sort fields to blank.
By default, files are sorted by the highest priority (Prty >) and oldest date and time (Date < and Time <). In the sort criteria, a greater-than sign (>) indicates ascending sort order and a less-than sign (<) indicates descending sort order. Possible sort criteria are as follows:
|
Value |
Sorts by |
Sort Order |
|
Prty> |
Priority |
highest to lowest |
|
Prty< |
Priority |
lowest to highest |
|
Class |
File class |
lowest to highest |
|
File |
File name |
alphanumerically |
|
Size> |
File size |
largest to smallest |
|
Size< |
File size |
smallest to largest |
|
Form |
Form name |
alphanumerically |
|
Date< |
Date |
oldest to newest |
|
Time< |
Time |
oldest to newest |
|
Date> |
Date |
newest to oldest |
|
Time> |
Time |
newest to oldest |
|
(blank) |
(Field not used) |
(Field not used) |
Sort retain files by ____ ____ ____ ____
You can specify up to four fields for sorting files on the spool Restore screen, which is used to manage retained spool files. The default is to sort by the newest date and time (Date > and Time >). Sort criteria choices for this option are the same as those for the Sort spool files by option.
See Chapter 24, Print Spool Operation, for more information about the spool Restore feature. See Retain Options later in this section for more retain options.
Allow operator to modify file attributes?
Choose whether the PC operator can change the attributes of spool files from the Print Spool screen. You can allow the operator to change fields as needed, or you can use fixed criteria that the operator cannot change.
Yes – Default. From the Print Spool screen, the operator can use the File command to modify file attributes that control which jobs print. The operator can change these attributes: State, Disposition, Form, Class, Priority, and Copies. For more information about this feature, see section 24.3, Files Command.
No – Operators cannot alter file attributes that control which jobs print. This option ensures that the same preset criteria are always used to control print jobs. The operator also cannot view files or their spool headers or delete files.
When you choose this option, the Ready Files command replaces the Files command on the Print Spool screen. The operator can use the Ready Files command to change the file state from Hold to Ready, usually to recover from spool or printer errors. For more information about this feature, see section 24.3, Files Command.
Check SPOOL directory for new files every seconds.
Specify how often the software will check for new files in the spool directory and update the list of files on the Print Spool screen. This option affects only those files copied into the spool directory from DOS or the LAN. Files received from the host computer display immediately upon arrival. The default check interval is 300 seconds.
Performance Tuning: Do not use a short interval, such
as 5 seconds, because frequent checks reduce software performance.
Log operations to LOG device?
Specify whether messages are written to the console log file to help
you track print spool activity. To use this feature, you must specify
LOG(FILE) on the Assign Devices screen. For more
information about the console log, see section
10.6.
No – Default. Spool activity messages do not appear in the log file.
Yes – Messages are written to the console log file when spool files are printed, reprinted, deleted, retained, or restored. See section 21.7 for examples.
These advanced spool options control the spool reprint feature. For more information about the spool reprint feature, see section 24.7.
Include spool header only once during reprint?
When you reprint spool files, choose whether the spool header information is sent to the printer only once for a given file or with each reprint operation for that file. The selection you make depends on your printer’s requirements.
Yes – Default. When you use the reprint operation, the spool header information is included only in the first portion of output sent to the printer. For example, if the operator selects Print Test Page and then starts reprinting the job, the spool header information is sent only with the test page. It is not sent again when the file begins to print. Choose this value if sending the spool header more than once causes problems for your printer.
No – When you use the reprint operation, the spool header is included with each portion of the output sent to the printer. Choose this value if your printer requires the spool header for each portion of output.
Save fast reprint repositioning information?
This option controls how files are repositioned for spool reprint operations. Choose whether the software stores repositioning information as it prints each spool file, to help it quickly reposition the file in case you use the reprint feature. Your selection depends on the size of the files you need to reprint.
No – Default. The software does not store repositioning information. If you reprint the file, the software starts at the beginning of the file and advances page by page until it finds the last print offset, the line where the job stopped printing. This method works best for reprinting most files.
Yes – As a file prints, the software keeps track of the last page printed in case it needs to reposition for reprint operations. If you reprint the file, the software instantly locates the last page printed and repositions to the top of that page. This method works best for reprinting huge files (for example, files that contain 100 million bytes). It requires processing to track pages as they print.
These advanced spool options control the spool retain feature for saving and restoring spool files.
Display spool header information on Retain directory screen?
Choose whether to automatically display file attributes for all files on the Restore screen. Your selection affects how quickly the Restore screen displays and depends on the average number of files stored in the retain directory at the same time.
Yes – Default. File attributes from the spool header display on the Restore screen when you select the Restore command. Use this selection if, on average, less than 300 files reside in the retain directory.
When you select the Restore command on the Print Spool screen, the software processes each file’s spool header and then displays the Restore screen. When the retain directory contains hundreds of files, spool header processing can take several minutes and delay display of the Restore screen. For example, if 2,000 files are in the retain directory, it could take 10 minutes for the Restore screen to display.
No – With this selection, file attributes do not display for every file, but you can display attributes for selected files as needed. The Restore screen displays without a delay. Use this selection to improve Restore screen performance when, on average, more than 300 files reside in the retain directory.
For more information about displaying attributes for individual files, see View File Attributes in section 24.6.
Use current date and time when Retaining files?
Choose whether to use the file’s original date and time or to change to the current date and time when files are copied to the retain directory.
Yes – Default. Change to the current date and time when a file is copied to the retain directory. This choice helps you determine how long a file has been stored in the retain directory. It is useful if you plan to automatically purge files from the retain directory at regular intervals, because the file’s original date does not necessarily indicate how long the file has been in the retain directory.
Files received from the host or submitted with the PRT utility are assigned the current PC date and time when they arrive in the spool directory, but they might not be retained the same day they arrive. Files copied from the PC or the network keep their original dates in the spool directory, but their dates might already exceed the retain period.
No – Use the file’s original date and time when a file is copied to the retain directory. This choice helps you determine the age of the original file.
Delete old Retain directory files?
If you enabled the retain directory feature, choose whether old retain files are automatically deleted. You can use this feature to periodically free disk space when you retain a large number of files.
No – Default. You must manually delete files from the retain directory. When you retain a large number of files, you should periodically delete the files from disk so they do not fill the hard drive.
Yes – Retained files are deleted automatically when the specified retain period expires. Set the retain period with the next option.
Retain files for __ days.
Specify the number of days that files are retained before the software automatically deletes them. The default retain period is 7 days.
Each time BARR/RJE starts and at midnight when the PC system date changes, the software compares the file date and time to the current PC date and time and deletes any files that exceed the retain period. When you choose a retain period, consider how many files you want to store at one time and how many files your hard drive can hold.
This option is valid only if you set Delete old Retain directory files to Yes. It works best when you set Use current date and time when retaining files to Yes.
The FAT automatically sets file attributes for spool files and is especially useful for unattended print spool operation. As files write to the spool directory, entries in the FAT can automatically set or override file attributes. The software updates the attribute values in the file’s spool header, displays them on the Print Spool screen, and uses them when the files print. You can set attributes for individual files, groups of files, or all files. You also can choose to maintain the FAT from the Installation Description or with an external FAT file.
For an example of what the table looks like, see Maintain an Internal FAT later in this section.
You can enable the FAT from the File Attribute Table (FAT) Options screen. To reach this screen, start from the Print Spool Description screen.
Select File
Attribute Table (FAT) Options.
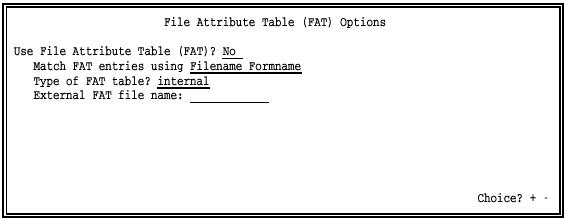
Use the first option on this screen to enable the FAT. Use the rest of the options to control FAT operation.
Use File Attribute Table (FAT)?
Choose whether to enable the FAT. You can use a table of file attributes to automatically set attribute values for print spool files or override existing attribute values. You can maintain the table internally from the Installation Description or externally from a separate file.
No – Default. Do not use the FAT.
Yes – Use the FAT to set or override file attributes as files arrive in the spool directory. The applied changes are written to the spool files, where they are stored in the spool header. Use the next three options to specify additional FAT features.
Match FAT entries using
Choose which two fields to use as the file match criteria. This option controls how the FAT displays and works and applies to either an internal or external FAT. Match criteria are used to determine whether or not FAT entries will be applied to a file. For more information about file match criteria and file override values, see How the Table Works later in this section.
Filename Formname – Default. File name and form name are used as the match criteria. Entries in the FAT are applied to spool files when the file name and form name of a file match a table entry. With this selection, the column headers of the File Attribute Table screen for an internal FAT appear as follows:

The State through Disposition fields are used as override values.
Filename Jobname – File name and job name are used as the match criteria. Entries in the FAT are applied to spool files when the file name and job name of a file match a table entry. This choice allows you to override the value of the form name in the file. With this selection, the column headers of the File Attribute Table screen for an internal FAT appear as follows:

The Form through Disposition fields are used as override values.
Filename FCBname – File name and FCB name are used as the match criteria. Entries in the FAT are applied to spool files when the file name and FCB name of a file match a table entry. This choice allows you to override the value of the form name in the file. With this selection, the column headers of the File Attribute Table screen for an internal FAT appear as follows:

The Form through Disposition fields are used as override values.
Type of FAT table?
Choose whether to maintain the FAT from the Barr software Installation Description or in a separate file.
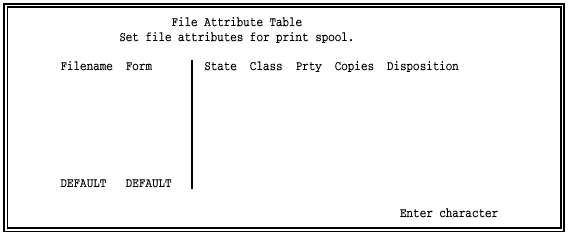
internal – Maintain the FAT from the Installation Description. The internal File Attribute Table screen displays when you finish with the File Attribute Table Options (FAT) screen and press ENTER. You can view and edit the table from the Installation Description. You can make up to 20 entries with the standard software or you can request a software version that enables up to 100 entries.
external – Maintain the FAT in a separate file that loads into extended memory (XMS) when you start the software. You can view the table during software operation and edit the external file with an ASCII editor. Use this choice if you need to make more than 100 FAT entries. See section 9.6, Maintain an External FAT File, for information about creating and modifying the FAT.
The software cannot convert an internal FAT to an external
FAT file. To change from an internal table to an external FAT file, you
must print the File Attribute Table screen from the Installation Description
and then re-enter the information in an external FAT file.
External FAT file name:
For an external FAT, specify the name of the file that contains the FAT entries. Include the full directory path.
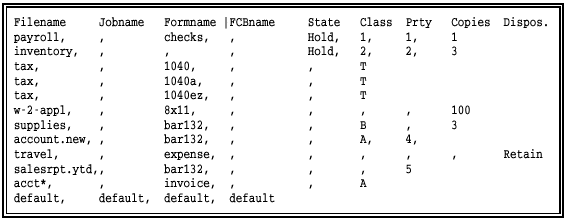
This section describes how table entries are applied to files.
Two-Part Entries – Each line in the FAT is a separate entry, and each entry has two parts: file match criteria and file override values. In the default internal table shown below, Filename and Form are the match criteria and State, Class, Prty, Copies, and Disposition are the override values. The table headings depend on your selection for the Match FAT entries using option.
As files are received to the print spool, the software compares their spool headers to the match criteria of each table entry. The override values in the table are used only if the match criteria (in this example, Filename and Form) of the file matches a table entry. When override values are applied to a file, they are saved to the spool header and displayed on the Print Spool screen.
If you specify both of the match criteria (for example, Filename and Form) in a table entry, then both values (Filename and Form) from the file must match the values in the table. If a table entry contains only one match value, only that value must match. For example, if you specify the Filename in the table but leave the Form blank, only the Filename must match. If you specify the Form in the table but leave the Filename blank, only the Form must match.
Multiple Matches – If more than one table entry matches the file, the software applies each matching entry cumulatively, beginning with the first entry of the table. For example, if there are two matching table entries, the software applies the attribute changes from the first matching entry followed by the changes from the second matching entry. If the first and second matching entries both change the same attribute (for example, the number of copies), the second matching entry replaces the value from the first matching entry.
Default Entry – You can use the default line at the bottom of the table to supply default attributes for any file whose file name or form name does not appear in the table. The default line begins with the word DEFAULT. It can provide values for most files and you can use individual table entries to specify exceptions for a few files. The default line is ignored if you do not enter any override values in it.
Blank Values – Only the override attributes that have values are applied to files. Where blank override attributes appear in the table, the value from the file, if any, is used.
Follow these guidelines when you enter match and override fields for an internal table or external FAT file.
Match Criteria – The first two fields in the table are file match criteria. You can specify one field or both fields, depending on how you want the override attributes to be applied. Which two match criteria you see depends on your selection for the Match FAT entries using option.
Filename
In the table entry, you can specify the complete file name or use DOS wildcards. If you specify the complete file name, it must be an exact match of the file’s full name, including the file extension, for the software to apply the override values. This means that a table Filename without an extension (for example, DATA) can only match a file without an extension, and a table Filename with an extension (for example, DATA.001) can only match a file with an extension. If you specify DOS wildcards, you can specify file names like DATA*.* or TAX??JUN.
Form
If you specify the complete form name in the table, it must be an exact match of the file’s form name, or you can use DOS wildcards in the form name (for example, STD* or CHECKS??).
Jobname
If you specify the complete job name in the table, it must be an exact match of the file’s job name, or you can use DOS wildcards in the job name (for example, DAILY* or ???RPT).
FCBname
If you specify the complete FCB name in the table, it must be an exact match of the file’s FCB name, or you can use DOS wildcards in the FCB name (for example, 66LPI* or ??LPI).
Override Values – The next fields are file override values. Override values are assigned if a matching entry is found in the table. The values you specify display on the Print Spool screen for the files they are applied to. Specify only those values you want to override and leave blank any values you do not want to change. You cannot use DOS wildcards in the override values. (During print spool operation, you can change these attribute values on the Print Spool screen.)
Form
You can set or override the file’s form name if you use Filename Jobname or Filename FCBname as the file match criteria. On the Print Spool screen, you can use form as part of the criteria that determines on which spool printer the file prints.
State
You can set the file’s initial state to Ready or Hold. (You can set the state to Delete only from the Print Spool screen.)
Ready – Default. Files begin printing immediately if their attributes match the criteria of the spool printer. Blank also indicates Ready.
Hold – Files cannot print until the operator sets the file state to Ready. This choice is useful for files that require the operator to load special forms paper in the printer.
Class
You can specify a number or a letter for the class value. On the Print Spool screen, you can use class as part of the criteria that determines on which spool printer the file prints. Files copied into the spool directory from DOS are automatically assigned a class of Z, unless you assign an override value (or use the PRT program).
Prty
You can use priority to control the order in which files print. Priority values can range from 0 to 9, where 0 is the lowest priority and 9 is the highest.
Copies
Specify the number of copies to print. If copies is not specified in the file and the number in the FAT is blank, the software assigns a default value of 1.
Disposition
Use the disposition attribute to selectively retain or delete files after they print or are deleted from the spool directory. For example, you can use individual table entries to set the disposition to Retain for files you want to save and then use the default entry line to set the disposition to Delete for all other files that do not have a matching table entry.
Retain – Files are copied to the retain directory after they print if you use this selection or leave the disposition blank. A blank disposition in the FAT entry causes a file to be retained, because the software retains all files by default when you specify a retain directory.
Delete – Files are deleted after they print.
If you choose to maintain an internal table, when you finish with the File Attribute Table (FAT) Options screen and press ENTER, the File Attribute Table screen displays.
The file match criteria and override values you see on this screen depend on your choices for the Match FAT entries using option. The table entry fields were described earlier in this section.
You can make up to 20 table entries. If you need more than 20 entries, you can request a software option that supports 100 entries (or you can use an external FAT file).
Follow these guidelines when you make table entries:
Use the LEFT ARROW, RIGHT ARROW, or TAB keys to move within a table entry and to move from one entry line to another.
To move from the first entry line to the last one, use the UP ARROW key. To move from the last entry line to the first one, use the DOWN ARROW key.
When you finish making entries, press ENTER to return to the Print Spool Description screen.
To learn more about how the FAT works, review these sample entries for an internal FAT.
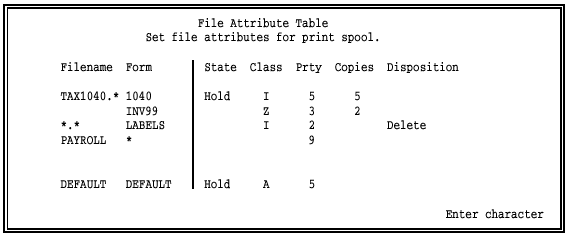
According to this table:
All files whose names begin with TAX1040 and have the 1040 form are placed on hold and are assigned Class=I, Priority=5, and Copies=5. Files are retained after they print, unless the spool header contains Disposition=Delete.
Any file with the form INV99 is ready for printing and is assigned Class=Z, Priority=3, and Copies=2. The file is retained after it prints, unless its spool header contains Disposition=Delete.
Any file with a form name of LABELS is ready for printing and is assigned Class=I and Priority=2. The copy count from the file is used. If the file copy count is blank, a default copy count of 1 is assigned. After it prints, the file gets deleted.
Any file named PAYROLL is assigned Priority=9, the highest priority. The file is retained after it prints, unless its spool header already contains Disposition=Delete.
Any files whose attributes do not match those listed in the match columns are put on hold and assigned Class=A and Priority=5. The file is retained after it prints, unless its spool header already contains Disposition=Delete.
When you finish making table entries, press ENTER to return to the Print Spool Description screen.
This section tells you how to create and edit the external FAT file. You need to create an external FAT file if you set Type of FAT table to external on the File Attribute Table (FAT) Options screen.
After you create the external FAT file, test it according to the instructions in section 24.8.
Before you begin making external FAT entries, check that your PC has enough memory to load the number of entries you need.
The number of entries the external FAT can hold is limited only by the amount of extended memory (XMS) available on your PC. To estimate the amount of XMS required for the external FAT, multiply the number of entries by the maximum number of bytes per entry. For example, if you use Filename Jobname for the match criteria and need 1,500 table entries at 50 bytes each, the FAT would require about 73 KB of XMS.
Use the Memory allocated for buffers and Extended memory allocated for buffers options to adjust the amount of extended memory the Barr software uses. For more information about these memory options, see section 18.6, Trace and Memory Options.
To learn more about creating an external FAT, review these sample entries. The example file below is for a FAT file that uses Filename Formname as the file match criteria.
Notice how the fields are aligned in columns below the column headers and how commas delimit fields or serve as place holders for blank fields. These features are discussed in the guidelines that follow.
Follow these guidelines when you create or modify the FAT file.
Entry Types – The external FAT file requires three types of entries:
A header line (first line)
Entry lines (lines 2-n)
A default entry line (last line)
File Format – The external FAT file must have a generic, comma-delimited format compatible with the comma-separated value (CSV) format used by Microsoft Excel. You can create the file with a custom application program, the Microsoft Excel program, a standard program editor, or the DOS EDIT utility.
Header Line – The first line of the file is a header line. Use the header line to align the fields for each entry into columns. When you align the fields, the table is easier to read and edit. The header text is for your use only. It does not change the expected order of the fields or affect the function of the table.
 If you do not use a header line, the file’s first line should
be blank because the Barr software discards the first line.
If you do not use a header line, the file’s first line should
be blank because the Barr software discards the first line.
Fields – You must include a column for each of the nine possible fields. Which fields you use depends on your selection for the Match FAT entries using option. The order of the fields in the entry lines is the same, regardless of your selection. The field order is as follows:

In the header line, you might want to mark the match criteria to indicate which fields are being used and help distinguish match fields from the override fields, as shown in the examples below.
When you match by Filename Formname, you do not use the job name and FCB name fields.

When you match by Filename Jobname, you do not use the FCB name field and the form name becomes an override field.

When you match by Filename FCBname, you do not use the job name field and the form name becomes an override field.

Entry Lines – All lines that follow the header line are FAT entries. Follow these guidelines when you make table entries.
Entry Delimiter. The ASCII carriage return character, represented as a hexadecimal 0D, defines the end of each line. Press ENTER to insert this delimiter after the last field you enter on each line.
Ignored Characters. Within an entry, the software ignores extra spaces and tabs between fields. Use these characters to align fields within columns. You also can insert blank lines to make the file more readable, because the software ignores blank lines between entries.
Field Separator. You must use commas (,) to separate fields. If a field is empty, use a comma as a place holder. Be sure to align the comma in the correct column. Because the last field you enter on each line is followed by the ASCII carriage return, you do not need to insert a comma separator after the last non-blank field or use comma place holders to fill unused columns that follow the last field. See the external FAT file example earlier in this section for examples of how to use commas.
Follow these guidelines for the state and disposition fields. Guidelines for other fields are given under FAT Criteria in section 9.5.
State Field Values. Valid values for the state field are Ready and Hold. The software only looks at the first character of the field. If you specify R or r as the first character, the file state is set to Ready. If you specify H or h as the first character, the file state is set to Hold.
Disposition Field Values. Valid values for the disposition field are Delete and Retain. The software only looks at the first character of the field. If you specify D or d as the first character, the disposition is set to Delete. If you specify R or r as the first character, the disposition is set to Retain.
Default Entry Line – The last entry line of the FAT file is used as the required default entry. Values from the default entry line are applied to any files that do not match entries in the table.
You must enter a default line even if you do not plan to use
it.
If you do not want the default entry to affect any files, enter the word default in the first column of the entry line, and leave the rest of the entry line blank. For more information about using the default line, see How the Table Works in section 9.5.
You can specify default spool printer settings on the Printer Initialization screen. The settings on this screen control how spool printers select files to route and they take effect each time you start the software.
From the Print Spool Description screen, select Initial SPOOL Printer
Settings.
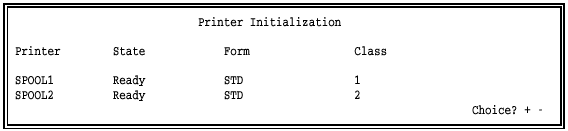
You can change these fields on the Print Spool screen during spool operation, but each time the software starts it resets the spool printer criteria to the initial values specified on this screen.
You can assign the following startup values. The values for these fields must match a file’s attributes for the file to print.
Printer
The name of the spool printer displays in this column. The number of printers that display on this screen depends on the number of spool printers you specified on the Print Spool Description screen.
State
This option sets the initial state of the spool printer at software startup. You can specify a different state for each spool printer.
Ready – Default. At software startup, files begin printing immediately if their file attributes match the spool printer criteria.
Reprint – A file enters the reprint state if its file attributes match the spool printer criteria. Before the file can start printing, the PC operator must position the file at the location where reprinting will begin.
Disabled – The spool printer is disabled. Files will not print until the operator changes the printer state on the Print Spool screen.
If you want to print files that have a certain form name at software startup, enter a form name. The form name can contain up to eight characters. You can include the DOS wildcards * and ? in the form name to select groups of forms. If this field contains only an *, the form name is not used in the print selection criteria.
Class
If you want to print files that have a certain class at software startup, enter one-character class names. The class name can consist of either a number or a letter. Files copied into the spool directory from DOS are automatically assigned a class of Z, unless you assign a different class with the PRT program or the FAT. You can enter up to five classes for each printer. If this field is blank, class is not used in the print selection criteria.