The Assign Devices screen displays the source and destination devices you define in BARR/RJE, including the devices specified from the RJE Description, Devices and Printers, and Print Spool Description screens. If you purchased any option software, such as PRINT370, devices corresponding to those options also display.
From the Assign Devices screen, you can direct the data received from source devices to the destination devices of your choice. This action is called device assignment.
Default device assignments for software startup are defined in the Installation Description. Each time the software starts, the default assignments take effect. You can change the assignments during software operation. Your changes remain in effect until the software restarts.
This chapter explains data flow to and from the PC, introduces you to the device assignment screen, and describes the available source and destination devices. Each section includes examples.
To understand the purpose of source devices, destination devices, and device assignment, you need to understand how data flows into and out of the PC running BARR/RJE. This section discusses how data flows between the PC and the host computer and how data flows between the PC, PC devices, and the LAN. You can receive data to the PC from the host computer, the LAN, or PC input devices such as a card reader. You can send data from the PC to the host computer, the LAN, or PC output devices such as printers.
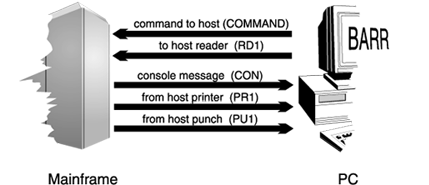
BARR/RJE can send data from the PC to the host computer and receive data from the host computer to the PC. You can issue commands to the host computer from the PC keyboard. BARR/RJE sends files or jobs from the PC to the host on a host reader device. In turn, the host sends command responses or operator messages to the PC, where they display on the PC console. BARR/RJE receives print files from the host to the PC on the RJE print stream, or printer. Usually, data files to be processed by application programs are received to the PC from the RJE punch stream, or punch.
Figure 10-1. You can send commands and files from the PC to the host computer and receive command responses and files from the host computer to the PC.
BARR/RJE can send data from the PC to PC devices or to the LAN. For example, it can send a PC data file to a PC printer, a network directory, or a network printer. Additionally, BARR/RJE can input data to the PC from PC devices or the LAN. For instance, you can input a file to the PC from a LAN directory or from a device connected to the PC serial port.
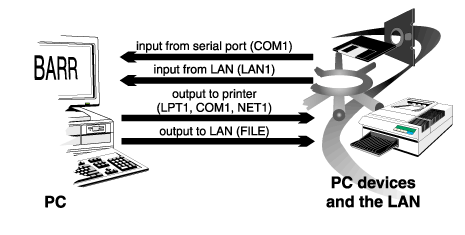
Figure 10-2. You can send data from the PC to other PC devices or to the network and receive data to the PC from the network or from PC devices.

 To reach the device assignment screen, from the Installation
Description menu, select Assign
Devices.
To reach the device assignment screen, from the Installation
Description menu, select Assign
Devices.
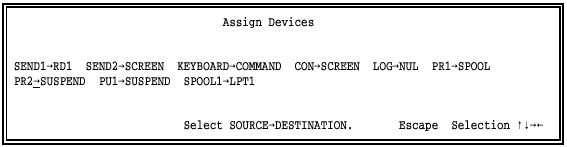
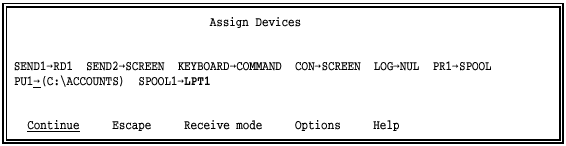
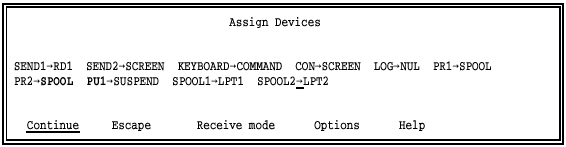
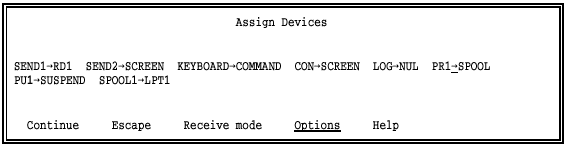
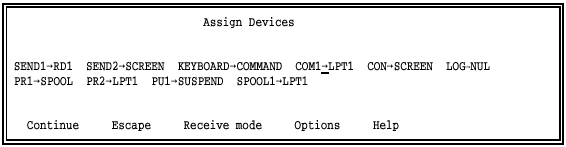
The screen below shows the initial device assignments in the software. Any additional devices you define are reflected on your screen.
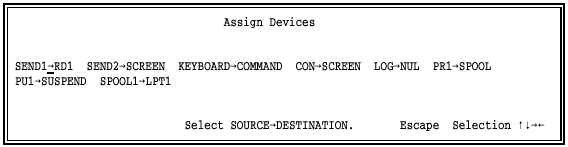
Source and destination devices display in pairs separated by an arrow.
The arrow shows the direction of the data flow. For example, in the pair
SEND1 RD1, SEND1
is the source device and RD1
is its destination.
RD1, SEND1
is the source device and RD1
is its destination.
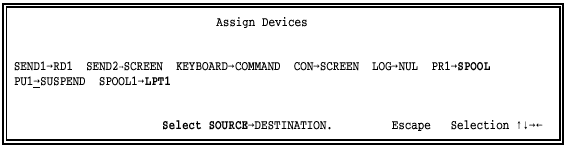
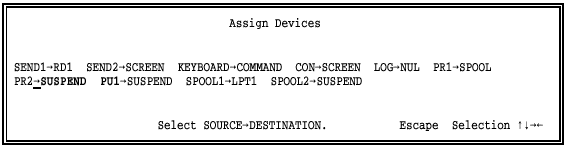
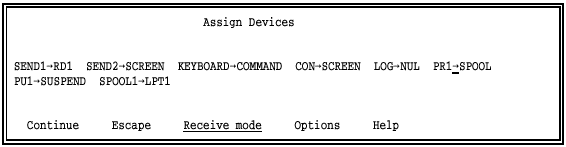
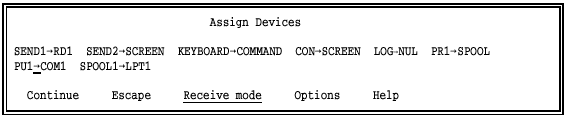
To assign devices, select a source device with the cursor. Notice that the arrow blinks when the cursor rests under it. When you press ENTER, a list of destination devices displays. See section 10.3 for a description of the available source and destination devices.
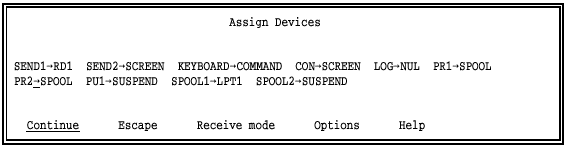
After you make an assignment, the Assign Devices screen is updated to reflect your selection and a menu line displays at the bottom of the screen.
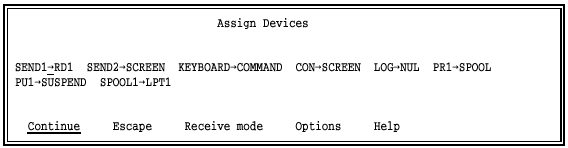
Choose from the following options:
Continue
Make another assignment. The cursor returns to the assignment area of the screen.
Escape
Return to the Installation Description screen. When you finish making assignments, select Escape or press the ESC key.
Receive mode
Assign a receive mode to a device. The receive mode selections display at the bottom of the screen. See section 10.8 for more information about receive modes.
Options
Assign options to a device. The Assign Devices Options screen displays. See section 10.9 for more information about these options.
Help
Display a help screen that contains hints for using the Assign Devices screen.
Data sources and destinations are relative to the Barr software. Data flows into the software from source devices. Data flows out of the software to destination devices. You can define up to 40 devices in the software. The devices you enable display on the Assign Devices screen.
This section describes the available source and destination devices listed in Table 10-1. Devices you enable from option software are described in the corresponding option manual.
Table 10-1. Data Sources
|
Data Source |
Source Device Name |
|
PC file |
SEND1-SEND2 |
|
PC keyboard |
KEYBOARD |
|
PC serial port |
COM1-COM4 |
|
Console message |
CON |
|
Console log file |
LOG |
|
RJE printer |
PR1-PR7 |
|
RJE punch |
PU1-PU4 |
|
Spool printers |
SPOOL1-SPOOL8 |
|
File from LAN directory |
LAN1-LAN4 |
|
File from Novell queue |
NW_QUE1-NW_QUE4 |
Table 10-2. Data Destinations
|
Data Destination |
Destination Device Name |
|
PC file |
(FILE) |
|
PC screen |
SCREEN |
|
Discard |
NUL |
|
Suspend flow |
SUSPEND |
|
PC parallel port |
LPT1-LPT3 |
|
PC serial port |
COM1-COM4 |
|
Host |
COMMAND |
|
Host file |
RD1-RD4 |
|
Spool directory |
SPOOL |
|
Network printer |
NET1-NET12 |
The available source devices display on the Assign Devices screen. Each source device displays before an arrow. Source devices include devices you enable and devices the software automatically provides.
SEND1-SEND2
You can direct files on disk to a destination by using one of the send
devices. Data is not routed until you issue the Send Files command from the Operation
screen. The most common example is to submit a job to the mainframe computer
with SEND1RD1.
You can enable the send devices from the Devices and Printers menu, as described in section 8.9. See section 21.4 for more information about the Send Files command.
KEYBOARD
You can send commands you type at the PC keyboard to the host computer
with the assignment KEYBOARDCOMMAND. Use the Command to Host option on the
Operation screen to enter commands, as described in section
21.2.
The keyboard device is enabled automatically. You can disable it by
setting KEYBOARDNUL, but you cannot remove it from the Assign
Devices screen.
COM1-COM4
You can input files on a PC serial port. The software inputs data automatically when it detects files. For example, you can attach a card reader or a VAX computer to the PC COM1 port to input files. (You can also use serial ports as destinations.)
You can enable the COM devices from the Devices and Printers menu, as described in section 8.4.
CON
Console messages for the remote PC operator originate from the host
computer or from the Barr software. Usually you direct these messages
to the PC screen by setting CONSCREEN. As soon as messages are detected, they
display at the bottom of the console portion of the Operation screen.
As new messages display, older messages scroll off the screen. See section 21.7
for more information about the types of messages that display.
The console device is enabled by default. You can disable it by setting
CONNUL, but you cannot remove it from the Assign
Devices screen.
LOG
The console log is a copy of the messages written to the PC console
(CONSCREEN). If you want a record of processed files,
you can direct copies of messages to a file by assigning LOG(CONSOLE.LOG). (If you assign LOGSCREEN, the log data will be deleted to prevent
duplicate messages from displaying on the screen.) You can browse the
log from a DOS session while it is being updated by the software. See
section 21.7
for more information about the types of messages you can log.
The log device is disabled by default, but you cannot remove it from
the Assign Devices screen. You can enable it by setting LOG(FILE) and assigning a file name, as described
in section
10.6.
PR1-PR7
Print files from the host RJE system are received on print streams.
RJE print files usually contain carriage control information. Typically,
you direct them to a PC printer, as in PR1SPOOL or PR1LPT1. You can set up the software to receive
print stream data automatically or to wait for you to issue a command
to the host to initiate the data flow.
You can enable the RJE printer devices from the RJE Description screen, as described in the Barr Host Definition Guide.
PU1-PU4
Punch files from the host RJE system are received on punch streams.
Punch files usually contain data that will be processed at the PC. Typically,
you will direct punch data to a PC file, such as PU1(TAXDATA). You
can set up the software to receive print stream data automatically or
to wait for you to issue a command to the host to initiate the data flow.
You can enable the RJE punch devices from the RJE Description screen, as described in the Barr Host Definition Guide.
SPOOL1-SPOOL8
Spool printers route data from the print spool queue to destination
devices, for example SPOOL1LPT1. (First, you need to direct files to the
spool directory with an assignment like PR1SPOOL.) You
assign each spool printer criteria for routing files. You can set up the
print spool to automatically route files or wait for operator action.
You can enable the spool printers from the Print Spool Description screen. See Chapters 9 and 24 for more information about print spool setup and operation.
LAN1-LAN4
The LAN connection devices route files from any DOS directory to the
destination of your choice. For example, you can send files from a network
directory to a PC printer by setting LAN1LPT1.
You can enable the LAN devices from the Devices and Printers menu, as described in section 8.10.
NW_QUE1-NW_QUE4
Data can be received to the PC from up to four Novell print queues.
You can direct print files to a PC-attached printer (for example, NW_QUE1LPT1).
You can enable the Novell queue devices from the Devices and Printers menu, as described in section 8.11.
When you select a source device on the Assign Devices screen, a list of destination choices displays. The screen below shows the default destination list. The destination choices on your screen include devices you enable and devices the software automatically provides.

After you choose a destination from the list, your selection displays
on the Assign Devices screen after the arrow (for example, PR1LPT1).
(FILE)
The file destination directs files to disk. You can route data to a file anywhere within the DOS file system, including to a floppy disk, hard disk, or LAN directory. When you select the file destination, you are prompted to enter a file name and specify other options. See section 10.5, Assigning a File as a Destination, for more information.
The file destination is enabled automatically. You cannot remove it from the destination list.
SCREEN
The screen destination directs files to the console portion of the PC
screen. The most common application is to set CONSCREEN so you
can view console messages. See section
21.7 for more information about console messages.
The screen destination is enabled automatically. You cannot remove it from the destination list.
NUL
Data sent to NUL
is discarded. For example, if you do not plan to use the console log device,
set LOGNUL to discard any data received from the log
source device.
The NUL destination is enabled automatically and cannot be removed from the destination list.
SUSPEND
Setting a device to SUSPEND
temporarily disables it. For example, PR1SUSPEND indicates that no data can be received
to the PC from the RJE printer. You might want to disable the data flow
for a short time while you service a PC printer. On certain error conditions
BARR/RJE automatically sets a source device to SUSPEND.
Do not set active devices to SUSPEND for long periods of time. While a device is suspended, data continues to flow into BARR/RJE. Because the data is not directed to a destination, it fills memory space needed by other software features and results in reduced software performance. To disable a device permanently, disconnect the physical device from the PC or disable the source device from the corresponding installation screen.
The SUSPEND destination is enabled automatically. You cannot remove it from the destination list.
LPT1-LPT3
The LPT destinations route data to a parallel printer attached to the
corresponding parallel port (LPT1, LPT2, or LPT3). For example, PR1LPT1 routes data from RJE printer 1 (PR1) to
the printer attached to the PC’s LPT1 port.
You can enable the LPT devices from the Devices and Printers screen, as described in section 8.3.
COM1-COM4
The COM destinations route data to a serial port device attached to
the COM1, COM2, COM3, or COM4 port. For example, you can attach a serial
printer to COM1 and assign PR1COM1. (Serial ports also can be used as sources.)
You can enable the serial devices from the Devices and Printers screen, as described in section 8.4.
COMMAND
The command device is a special destination for routing commands to
the host computer from the PC keyboard by assigning KEYBOARDCOMMAND.
The command destination is enabled automatically. You cannot remove it from the destination list.
RD1-RD4
The RJE reader routes files to the host. For example, set SEND1RD1 to submit a job to the host.
You can enable the reader devices from the RJE Description screen, as described in the Barr Host Definition Guide.
SPOOL
The spool device routes files to the print spool directory. For example,
set PR1SPOOL to direct files from RJE printer 1 (PR1)
to the print spool. Files in the print spool queue are directed to printers
by the source devices SPOOL1
to SPOOL8.
See section
10.7 for an example.
The spool device is enabled by default. You can disable it from the Print Spool Description screen, as described in Chapter 9.
NET1-12
NET devices route files to printers on a local area network. NET devices support three types of network printing. Most networks support redirection of LPT1 to LPT3 with device drivers, although some networks support redirection of LPT1 to LPT12. On the Novell network, you can use NET devices to route files to Novell print queues. On the TCP/IP network, you can use NET devices to route files to TCP/IP LPR (UNIX) print queues.
When you assign a NET device that writes to a network print queue, the network queue and server names display on the Assign Devices screen.
You can enable the NET devices from the Devices and Printers screen, as described in section 8.5.
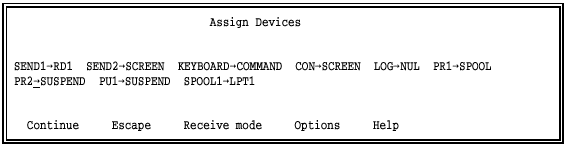
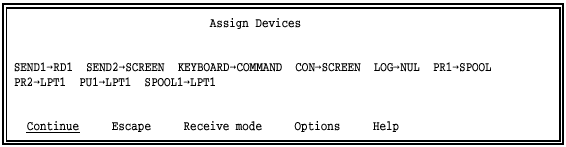
If you want all data from a given source to write to a single printer,
you can dedicate the source device to a printer. For example, you can
direct all the output from RJE printer 2 (PR2) to a PC printer connected
to LPT2 by assigning PR2LPT2.
Follow the steps below to make this type of assignment.
Select the source, in this example PR2, and press ENTER. A list of destinations displays.

Select the destination, in this example LPT2. When you press ENTER, the screen reflects your selection.
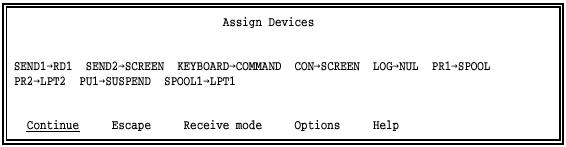
Select Continue to make another assignment, or press ESC to return to the Installation Description menu.
You also might want to assign a receive mode or options. See sections 10.8 and 10.9 for more information about these features.
You can direct data to a DOS file on a disk or the LAN. Typically, you
direct data that will not be printed to a disk file so it can be processed
by programs on the PC or the LAN. For example, you can direct data received
from RJE punch 1 (PU1) to a file by assigning PU1(FILE). When
you assign a file destination, the software prompts you to enter a file
name and you can select other options.
Follow these steps to assign (FILE) as a destination.
Select the source (for example, PU1) and press ENTER. A list of destinations displays.

Select (FILE) as the destination and press ENTER.
When you select (FILE) as a destination, the following screen displays:

Use the fields on this screen to specify the file name and other file options.
A file name can consist of a beginning, an ending, or both. You must specify at least one part of the name. Choices for the name ending are described under Ending of file name. Barr software follows the DOS file naming conventions. See the examples for naming files at the end of this section. If a DOS error occurs while naming the file, BARR/RJE attempts to resolve the error as described in File Name Error Handling, also at the end of this section.
Beginning of file name:
Specify the name for the received file, including the drive letter and full directory path.
If you specify only the Beginning of file name, include the drive letter, full directory path, and file name. If you do not include the path, the file is written to the current DOS directory.
You need to include the complete file path in the file name to be certain where the received files are located. For example, suppose you omit the directory path from the Beginning of file name, and you installed the software in the C:\BARR directory. When a file is received, if the current directory is C:\BARR the file is written to that directory per the DOS convention. Likewise, if the current directory is the C:\ root directory when a file arrives, the file is written to the root directory. When you try to locate the file, you might not remember which directory was current when the file was received. If you specify the full path in the file name field, you eliminate confusion about the file location.
If you specify only the Ending of file name, the file path depends on your selection. Some choices for the name ending have no file path and others include a portion of the file path. Each of these selections is described under Ending of file name. If you use an ending name selection that does not include a file path, files are written to the current DOS directory.
If you specify both parts of the file name, the complete file name is the combination of the two parts: Beginning of file name contains the drive letter and directory path, and Ending of file name specifies the file name. Some Ending of file name selections include a portion of the file path.
If the Beginning of file name includes a directory name, you must end the directory name with a backslash (\). If you want to combine the beginning and ending portions into an eight-character name, omit the backslash.
If you include a file name in the Beginning of file name field, it must be in the correct DOS format. A file name extension is optional. For more information about file extensions, see File Name Extensions later in this section.
Ending of file name is ___
You have eight choices for assigning an ending file name.
Some choices affect the file path. If you select formname\jobname for the ending, formname is included in the file path. If you select jobname\formname, jobname is included in the path.
If you select jobname, formname, fcbname, source filename, or from file, the file path is taken from Beginning of file name. If the beginning portion of the file name is blank, the file is written to the current DOS directory.
You can obtain the job name, form name, or FCB name from the JES2 $HASP190 message, SETUPHDR (PDIR) record, or the Barr OUTPUT statement used in file option. You can also obtain the job name or form name from the Barr Spool header from data option.
You might want to refer to other sections in this manual when you choose an Ending of file name. For a description of the Barr spool header, see Appendix E. For information about the $HASP190 message, see Appendix F. For a description of the Spool header from data option, see section 10.9.
jobname – Default. The job name stored in the spool header is used as the file name. See Example 1 later in this section.
 The job name from the $HASP190 message might
be unreliable, because the host generates the message only when the form
name changes.
The job name from the $HASP190 message might
be unreliable, because the host generates the message only when the form
name changes.
formname – The form name stored in the spool header is used as the file name.
formname\jobname
jobname\formname – Both the form name and job name are included
in the file name. The first value becomes part of the file path and allows
you to group files. The second value is the file name. If you select formname\jobname,
for example, the form name is included in the file path, and the job name
is used as the file name. See Example 2 later in this section.
The job name from the $HASP190 message might be unreliable,
because the host generates the message only when the form name changes.
fcbname – The FCB name stored in the spool header is used as the file name.
The FCB name information from the $HASP190 message might be
unreliable, because the host generates the message only when the form
name changes.
source filename
– When you assign SENDn(FILE), SENDnSPOOL, SPOOLn(FILE), or LANSPOOL, you can use this option to preserve the
original file name. Specify the destination file path under Beginning of file
name.
not used – Only the Beginning of file name is used. The Beginning of file name must include the full path and file name. Select not used when you direct data to device drivers. See Example 3 later in this section.
from file – The file name is obtained from a text line within the file. When you select this option and press ENTER, you are prompted to specify the location of the name within the file. See Example 4 later in this section.
Specify how to handle duplicate file names and whether to log file activity when you write to a file destination.
New File, Append, Replace, Replace Cond.
If a duplicate file name is encountered, choose whether to create a new file, append to the existing file, or replace the existing file. This selection displays to the right of Ending of file name.
New File – Default. If a new file does not have an extension or another file has the same name, BARR/RJE generates a numeric file extension and adds it to the name of the new file. When duplicate file names are encountered, this method preserves the existing file. See File Name Extensions later in this section for an example of the file naming sequence.
Append – The new file is added to the end of the existing file with the same name. When you receive files to the print spool (SPOOL), do not use this choice.
Replace – The new file overwrites the existing file. This choice might be useful if you receive a file with the same name each day and you do not want a large number of files to accumulate on the PC disk. This choice saves you the work of manually deleting the old files.
Replace Cond. – Replace conditional. The method used for naming the file determines whether the file is replaced or the file is assigned a unique extension.
If a new file’s name does not have an extension or if a file with the same name exists, BARR/RJE generates a numeric file extension and adds it to the name of the new file. When duplicate file names are encountered, this method preserves the existing file. See File Name Extensions later in this section for an example of the file naming sequence.
If a new file’s name includes an extension or ends in a period (.), the new file replaces the existing file. For example, a file named DAILYRPT. or DAILYRPT.MON would replace a file that has the same name.
Log, No Log
This option controls whether informational messages display on the console when files are written to disk.
Log – Default. Each time a file is written to disk, messages display on the console indicating the start and end of the file. For example:
WRITING: DAILYRPT
CLOSE: DAILYRPT
These messages are included in the console log file if you enable the
log file by directing LOG(FILE) on the Assign Devices screen.
No Log – Messages are not written to the screen or the console log file. This selection reduces the number of messages on the screen and in the console log file.
File name extensions allow greater flexibility for naming files. A file extension consists of a period (.) or a period followed by up to three characters (for example, .abc). You can use a file extension when you assign the file name, or BARR/RJE can automatically generate a numeric file extension.
When the destination is (FILE), you can include a file extension in the Beginning of file name or Ending of file name. When the destination is (FILE) the software generates a file extension if both these conditions are met:
You select New File or Replace Cond. on the file name assignment screen.
The new file has no extension or a duplicate file name was found.
The software also generates file extensions for duplicate files for the LAN retain directory, spool retain directory, and NET device driver features.
BARR/RJE generates file extensions to prevent it from overwriting files that have the same name. In some cases, the software assigns an extension to any file that does not already have one. In other cases, an extension is assigned only if a duplicate name is encountered. The process for assigning file extensions is similar in both cases.
The software searches the destination directory to determine if any files have the same name as the new file. If a duplicate name is found, the numeric extension n + 1 is assigned to the new file, where n is the highest extension found for that file name. For example, BARR/RJE assigns extension .001 to the first file, .002 to the next file with the same name, and so on.
If the same file name occurs thousands of times, additional renaming is performed. If extension .999 is reached, a #1 is placed at the end of the file name and the extension sequence starts again, continuing until #10.999 is reached. When #1 is added, the sequence numbers start over beginning with 000. For example, if the original file name is taxdata, a series of files with the same name would be renamed as follows:
taxdata.001, taxdata.002, ... taxdata.999
taxdat#1.000, taxdat#1.001, ... taxdat#1.999
taxdat#2.000, taxdat#2.001, ... taxdat#2.999
...
taxda#10.000, taxda#10.001, ... taxda#10.999
These examples illustrate several of the file naming options.
For easy file identification, you might want to use the job name assigned by the mainframe computer as the PC file name, especially if the mainframe file name is not meaningful. The job name will be extracted from the spool header, as explained in the description for the Ending of file name option.
Select PR2 as the data source.
Select (FILE) as the destination. The file name screen displays.

Enter the Beginning of file name, including the path. In this example, the path is C:\JOBS\. Include a backslash (\) at the end of the path.
For Ending of file name, select jobname.
Use the default options New File and Log.
When you press ENTER, the Assign Devices screen displays the Beginning of file name in parentheses after the source name.
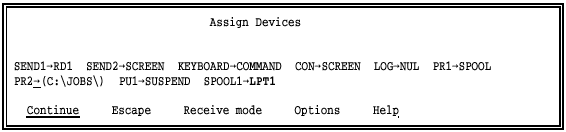
With this assignment, if you receive a mainframe file named JOB49127 that has a job name of PAYROLL the PC file name will be C:\JOBS\PAYROLL.001. (If you omit the backslash at the end of C:\JOBS\, the file name would be C:\JOBSPAYR.001.)
If you use both form name and job name to name files, you can group mainframe output on the PC or the network. For instance, the selection Ending of file name is formname\jobname allows you to route files to different subdirectories by their form name.
You can use this feature to route output files to the user who submitted the job. In this example, the user name is used as the form name, and a subdirectory named for each user is created on the network. The job name is used as the name of the file.
Assume output will be routed to three users named Ann, Gary, and John. Your first step is to create a subdirectory for each of these users on the network: F:\ANN, F:\GARY, and F:\JOHN.
From the Assign Devices screen, select PR2 as the data source.
Select (FILE) as the destination. The file name screen displays.

Enter the drive letter F:\ as the Beginning of file name.
Select formname\jobname as the Ending of file name.
Use the default options New File and Log.
When you press ENTER, the Assign Devices screen displays the Beginning of file name in parentheses after the source name.

When users submit a job, they must specify the job name and form name in the JCL. For example, if Gary wants output from a job routed to his network directory, he includes some statements similar to the JCL sample below in his job.
//JOBABC JOB (7000,4250,1,2,0),’G.SMITH’
/*JOBPARM FORMS=GARY
In this example, the jobname is JOBABC and the form name is GARY. When the output file is generated, the complete file name is F:\GARY\JOBABC.001, which means the file JOBABC.001 is placed in the directory F:\GARY.
A common application is to route output from the mainframe to a PC disk
file by using PU1(FILE). In most cases the mainframe output needs
only a Beginning
of file name. In this example, output from host punch 1
(PU1) is assigned to a file named ACCOUNTS.
From the Assign Devices screen, select PU1 as the data source.
Select (FILE) as the destination. The file name screen displays.

Enter C:\ACCOUNTS as the Beginning of file name.
For Ending of file name, select not used.
Use the default options New File and Log.
When you press ENTER, the Assign Devices screen displays the file name in parentheses after the source name.
With this assignment:
All files received to the PC from PU1 will be written to the directory C:\ and will have ACCOUNTS as their file name.
Because no extension was assigned to the file name and the New File option was used, the software automatically generates three-digit extensions as described under File Name Extensions. The first file received will be named ACCOUNTS.001, the second will be named ACCOUNTS.002, and so on.
Because the Log option was used, messages are written to the PC console when files are received.
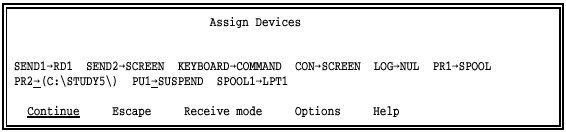
In some cases, you might want to name a file by extracting text from within the file. For example, you might want to use the job name that displays on the file’s banner page as the file name. You can extract the name with the from file selection for Ending of file name.
Select PR2 as the data source.
Select (FILE) as the destination. The file name screen displays.

Enter the Beginning of file name, including the directory path. In this example, the path is C:\STUDY5\. Include a backslash (\) at the end of the directory name.
For Ending of file name, select from file.
Use the default options New File and Log.
Press ENTER. An additional entry line displays for specifying the location of the name text:

Specify where the name is located in the file by entering the line number and the beginning and ending column positions.
When you press ENTER, the Assign Devices screen displays the Beginning of file name in parentheses after the source name.
With this assignment:
If the file contains the text GRADES05 on line 2, columns 1 to 8, then the combined file name is C:\STUDY5\GRADES05.001. The software automatically generates the file extension. (If you omit the backslash at the end of C:\STUDY5\, the name would be C:\STUDY5GR.001.)
The file name will be terminated by the ending column position or a blank character, whichever comes first. For example, the text GRADES 05 will become GRADES.
If no text is found at the specified position, the file is assigned the name ERROR and an error message displays on the PC console.
BARR/RJE attempts to resolve errors with file names or path names.
When the software names files according to the Assign Devices Beginning of file name and Ending of file name options, it substitutes an exclamation point (!) for an invalid DOS file name character. For example, if the file name contains a forward slash (/xyz), the software substitutes an exclamation point (!xyz). If the file name begins with a period (.abc), the software replaces the period with an exclamation point (!abc).
If the software encounters a path error, it changes the Ending of file name to ERROR and retries the path. If the software cannot resolve the path, it suspends the source device. The software does not change the Beginning of file name in this case.
If the software encounters a path error when Ending of file name is set to formname\jobname or jobname\formname, it omits the form name or job name from the path. If the software cannot resolve the path, it suspends the source device.
In each of these cases, the software also displays a console message to alert you to the error. For example, you might see this message if you leave the file name blank:
ERROR: file name is blank. File name changed to ’!’.
You can disable these messages from the Tuning and Global Options, Display and Disk Options screen.
You might want to see console messages on the screen while you use BARR/RJE
and have a log file of the messages for later reference. To create a log
file, assign LOG(FILE) on the Assign Devices screen. You can
assign any name to the log file. If you name it CONSOLE.LOG, the file
will be easier to identify.
See section 21.7 for more information about console messages.
From the Assign Devices screen, select LOG as the source.
Select (FILE) as the destination.

Enter C:\CONSOLE.LOG as the Beginning of file name.
Select not used for Ending of file name.
Select the Append option to append each message to the log file. (If you do not select Append, a new file will be created each time you start the software.)
Select No Log to prevent the message WRITING: CONSOLE.LOG from displaying on the screen each time a message is written to the log file.
If you set up the print spool feature, you need to direct print files to the spool directory and route files from the spool directory to spool printers from the Assign Devices screen. This section tells you how to perform the two assignment steps.
On the Assign Devices screen, the destination device SPOOL represents the spool directory and the source devices SPOOL1 to SPOOL8 are the spool printers or routers.
First, assign source devices to write to the destination SPOOL. The procedure for assigning SPOOL as a destination is similar to assigning (FILE) as a destination.
From the Assign Devices screen, select the source device (for example, PR2).

Assign the source device to the destination SPOOL.
Specify the file name and options. In this example, the Beginning of file name is blank and the Ending of file name selection is jobname.
 You do not need
to specify the file path, because you assigned the spool directory name
on the Print Spool Description screen.
You do not need
to specify the file path, because you assigned the spool directory name
on the Print Spool Description screen.
Section 10.5 describes the file name options.
When you press ENTER, the
screen reflects the assignment of PR2SPOOL.
Next, assign the spool printers to write to PC printers. The spool printers route files from the spool directory to the printers or destinations of your choice.
In this example, two spool printers have been defined: SPOOL1 and SPOOL2. The SPOOL1 device is already defined to LPT1. Follow these steps to assign SPOOL2 to LPT2.
Select Continue to return the cursor to the assignment area.

Select SPOOL2.

Select LPT2.
When you press ENTER, the screen reflects the new assignment.
When you finish making assignments, press ESC to return to the Installation Description screen.
Do not set a receive mode on the source devices SPOOL1
to SPOOL8,
unless you have the BARR/TAPE option and are assigning the destination
TAPE.
Receive modes change the format of the files received to the Barr PC from the data source. Specifically, they affect data translation and carriage control. Your choice for receive mode depends on how the data will be used after it is received to the PC. Some of the same options are available for both receive mode and send mode. Send modes are discussed in section 21.4.
When you assign a receive mode to a device, keep these points in mind:
All receive modes are valid for the RJE printer (PR1 to PR7) and RJE punch (PU1 to PU4) source devices.
You can use only the Fixed Length receive modes for the SEND, LAN, and SPOOL1 to SPOOL8 source devices. Fixed length is useful for these sources only when the destination is TAPE (requires the BARR/TAPE option).
None of the receive modes are valid with COMMAND, CON, or LOG.
The selected receive mode affects all files received on the source device. You can change the receive mode during software operation.
When the data from the mainframe arrives at the PC, it might
not be in exactly the same format as it was at the host computer, because
the RJE system processes the data stream as it leaves the host. The receive
mode in the Barr software changes the data received from the RJE system.
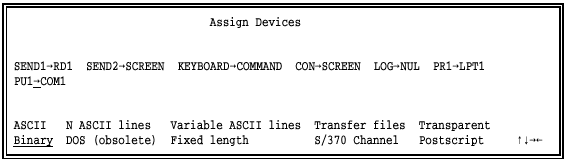
To reach the Receive Mode menu, follow these steps:
From the Assign Devices screen, assign the source device to a destination. A menu line displays at the bottom of the screen.
Select Receive mode from the menu line.
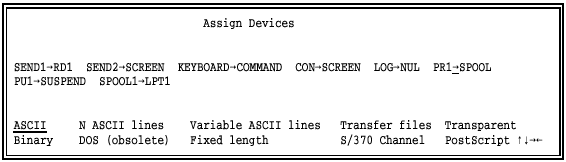
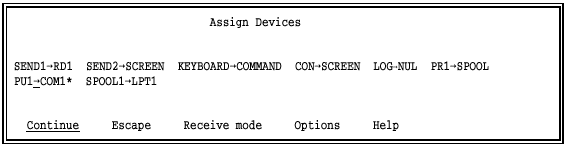
Select a receive mode from the list of choices on the lower portion of the screen. For example, select ASCII.
An asterisk (*) displays next to the destination device when you select a receive mode other than ASCII. Most PC applications use ASCII format.
You can select from the following receive modes:
ASCII
Default. ASCII is the format used on the PC and is required for files printed on an ASCII printer. If the original file is in EBCDIC format, it is converted to ASCII format with the ASCII carriage control codes carriage return (CR), line feed (LF), and form feed (FF). The EBCDIC format is used by host computers. See Appendix B for more information about these formats.
 Packed decimal data: Before you transfer data that
includes packed decimal fields, you should use a separate program to unpack
the data. Packed decimal data gets corrupted during translation from EBCDIC
to ASCII with any file transfer program.
Packed decimal data: Before you transfer data that
includes packed decimal fields, you should use a separate program to unpack
the data. Packed decimal data gets corrupted during translation from EBCDIC
to ASCII with any file transfer program.
Binary
Data remains in EBCDIC format, the format used by the host computer,
but BARR/RJE discards carriage control information. Binary receive mode
often is used when the received data will not be printed. This type of
data usually is received from a mainframe punch (PU1). A common application is
to assign PU1TAPE and Binary
receive mode when you receive data to magnetic tape. (TAPE displays as a destination
only if you purchased the BARR/TAPE option.)
When you receive data on a punch device, records are padded with blanks to the host punch width. Data received on a print stream (PR1) is not padded.
Additionally, when you receive data on the punch stream, if the last line of a file contains only blanks, the line is deleted. This removes the extra blank line JES2 adds to punch stream output.
N ASCII lines
A method for receiving files with fixed-length records longer than 80 characters. (Fixed-length records are records of equal length.) Some host systems can transfer only 80-character records, and N ASCII lines lets you work around this limitation. For records that are not an even multiple of 80 characters or have a length greater than 720 characters, Variable ASCII lines might be a better choice.
To use N ASCII lines, you must write a mainframe program to divide each dataset record into groups of 80-character lines. Each record must be divided into the same number of lines (from 1 to 9), so that all records have the same length. When the 80-character lines are received to the PC, the software rebuilds each record by combining the specified number of lines. The EBCDIC data from the host is converted to ASCII format with a carriage return and line feed (CR LF) to indicate the end of each record, but no form feeds are added (FF) to indicate page boundaries.
When you select N ASCII lines, you are prompted to specify the number of 80-character lines that should be combined into one record. Choices are 1 to 9, where 9 allows a maximum record length of 720 characters.
For the MVS/JES2, MVS/JES3, and VS1/RES systems, another solution is to use the BARR/TRAN mainframe program. This program is provided on the Barr software disk and is usually installed in the C:\BARR\TRAN\ directory. BARR/TRAN can transfer records of any size. For more information about using BARR/TRAN, request the BARR/TRAN manual from Barr Systems.
DOS (obsolete)
Obsolete selection. (This option serves as a place holder to enable configuration files from older versions of Barr software to remain compatible.) Use the Transfer files receive mode instead.
Variable ASCII lines
A method for receiving variable-length or fixed-length records that are shorter or longer than 80 characters. (Variable-length records have different lengths, while fixed-length records have the same length.) Some host systems can transfer only 80-character records. If you need to transfer records with a different length, the Variable ASCII lines selection lets you work around this limitation. If records are an even multiple of 80 characters (160, 240, and so forth), N ASCII lines might be a better choice.
With the Variable ASCII lines selection, BARR/RJE receives 80-character records from the host and rebuilds them to their original lengths. The EBCDIC data from the host is converted to ASCII format with a carriage return and line feed (CR LF) to indicate the end of each record, but no form feeds (FF) are added to indicate page boundaries.
To use this feature, you must write a mainframe program to divide all records into 80-character lines. If the record length is not an even multiple of 80, the last line for the record can have less than 80 characters. The mainframe program must insert a record indicator at the end of each record. The EBCDIC vertical bar (|, or hexadecimal 4F) is the default delimiter. You can change the delimiter character with the Variable record length delimiter option under Tuning and Global Options, Miscellaneous Options.
For example, you would divide a 120-character record into two parts: an 80-character line and a 40-character line that ends in a vertical bar. When the data is received to the PC, the software rebuilds each record by combining lines until it encounters a vertical bar. The software discards the vertical bar and any blanks the RJE system added to pad the last portion of the record to 80 bytes.
For the MVS/JES2, MVS/JES3, and VS1/RES systems, another solution is to use the BARR/TRAN mainframe program. This program is provided on the Barr software disk and is usually installed in the C:\BARR\TRAN\ directory. BARR/TRAN can transfer variable-length records and handle records of any size. For more information about using BARR/TRAN, request a BARR/TRAN manual from Barr Systems.
Fixed length
A format for special applications, usually situations that require the received data to contain fixed-length records. (Fixed-length records are records of equal length.) For example, you can use Fixed length receive mode to receive data to magnetic tape or receive data that will be processed by a PC program.
For the SEND1 to SEND2, LAN1 to LAN4, and SPOOL1 to SPOOL8 source devices, Fixed length is the only receive mode supported. You can use Fixed length for these devices only when BARR/RJE writes to magnetic tape (requires BARR/TAPE).
When you select Fixed length, additional options display at the bottom of the screen. See Fixed Length Receive Mode later in this section for a description of these options.
Transfer files
An internal, intermediate format used for general file transfer from PC to PC or with the mainframe program BARR/TRAN for transferring between MVS and PC file structures. See section 26.2 for examples of applications that require this format.
S/370 Channel
Required when you print to an S/370 channel printer. S/370 Channel receive mode is used only with the PRINT370 option (purchased separately) and is not valid for the Xerox 4235 printer. Data is converted to variable length binary records using the Realia COBOL format. (This is different from the Binary receive mode. Binary in this context means data can contain any character from 00 to FF.)
Carriage control – When you select the S/370 Channel receive mode, you are prompted to select the type of Carriage control.
normal – Default. BARR/RJE uses the carriage control received from the mainframe. This is the recommended choice.
Machine – Use this choice when all jobs have a record format of FBM or VBM and the jobs do not print correctly with Carriage control: normal. Specify RECFM=FB or RECFM=VB in the JCL.
See your PRINT370 manual for more information about S/370 Channel receive mode, especially for details about replacing a Xerox 871CM with the PRINT370 product.
Transparent
BARR/RJE does not change the data. Some applications require unaltered data. The received data might not have the exact format it did on the host computer, because the RJE system might have processed it during transfer from the host.
Transparent receive mode is valid only for SCS type data streams, namely data from SNA RJE, 3287 (3270 LU Type 1, requires RJE+3270), 5250 printers (requires PRINT/TWINAX), and XPAF print streams. For example, you need to use Transparent receive mode if you use the SCS Enabler option on the Xerox 3700 printer or the EBCDIC Parallel Meta/GHO Enabler-IB option on the Xerox 4235 printer.
PostScript
Convert EBCDIC files to the PostScript format required by PostScript printers. You must use the three form overlay files (PORTRAIT, LAND, and 2UP) that are provided in the directory C:\BARR\REF\PSOVL\ with PostScript receive mode. The overlay files set the printer to the desired mode and define PostScript macros. In the received files, data converted to PostScript format is enclosed in parentheses. Carriage control (such as CR, LF, and FF) is converted to macro calls that are controlled by the overlay file. Carriage control is placed between data lines.
You can use PostScript receive mode only with source devices that support receive modes (such as PRn and PUn) and only with destination devices that support form overlays (including LPTn, COMn, and NETn).
The overlay files contain some user-selectable options you can change by editing the overlay file. After you make changes with a program editor, you must copy the overlay files to the forms overlay directory defined under Devices and Printers, Miscellaneous Printer Options. To activate the overlay, the name of the overlay file must be included in the spool header. See section 8.7, Forms Overlay, for more information.
Files received from sources other than the host cannot be
processed by PostScript
receive mode. For example, files from PR1
can be converted to PostScript, but PostScript
receive mode does not apply to files input from LAN connections (for example,
LAN1).
If you want to print files from other sources in PostScript format, the
files must already be in PostScript format before they are received to
the PC.
You can edit the supplied overlay files or create additional
overlay files from scratch by using the structure of the supplied files
as a guide, but Barr Technical Support analysts cannot assist you with
any modifications.
You can use Fixed length receive mode for special applications or situations that require data records to have a fixed length.
A common application for fixed-length receive mode is receiving print
files to a PC magnetic tape drive by assigning PR1TAPE. (Requires
the BARR/TAPE option, which you must purchase separately.) The ASA carriage
control character can be included as the first character of the fixed-length
record, which allows the data to print correctly.
Fixed-length records also are useful when you will process data at the PC. Data used as input for application programs — such as programs that generate a report or add the records to a database — is often in fixed-length format.
When you select Fixed Length from the list of receive modes, the following options display at the bottom of the screen:
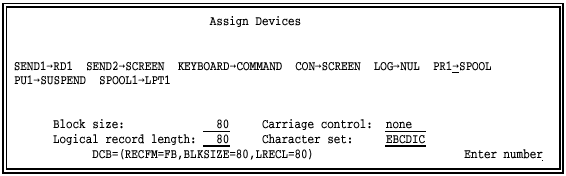
Select values for the fields. Use the arrow keys to move around the screen.
Press ENTER to preserve your changes. Then press ESC to return to the Assign Devices screen.
The last line on the screen (DCB=) contains the IBM JCL Data
Control Block (DCB) description. This line changes to reflect your selections.
Specify these Fixed length options:
Block size:
The maximum length of blocks written to tape. The block size is ignored unless the destination is TAPE. The maximum value is 32760.
Logical record length:
The total length of the fixed-length records including the ASA carriage control character, if any. The maximum value is 255.
If you select ASCII variable or EBCDIC variable for Character set, records will have a variable length. To prevent the variable-length records from being truncated, set the logical record length to the maximum value.
Carriage control:
The type of carriage control.
none – Carriage control characters are discarded.
ASA – ASA carriage control is used. BARR/RJE converts SCS carriage control (used by the RJE system) to ASA carriage control. (If the host file has no carriage control, the RJE system adds SCS carriage control. If the host file has machine or ASA carriage control, the RJE system converts it to SCS.)
Character set:
Specify which character set to use for the data.
EBCDIC – Data remains in EBCDIC format and is padded or truncated to fit the specified record length. Control characters included within transparent strings (TRN) are preserved. Control characters not included in transparent strings are converted to carriage control or are discarded, including CR, LF, FF, IRS, NL, VT, TRN, SEL, HT, BS, and CSP. These characters are documented in Appendix B.
Data received in this format usually is written to magnetic tape or is processed by an application program. Usually this type of data will not be printed.
ASCII – Data is converted from EBCDIC to ASCII, and records are padded or truncated to fit the specified record length. The ASCII data does not contain carriage return and line feed pairs (CR LF) to indicate record boundaries or form feeds (FF) to indicate page boundaries. Usually, this type of data will not be printed.
ASCII with CR LF – Data is converted from EBCDIC to ASCII, and records are padded or truncated to fit the specified record length. The ASCII data includes carriage return and line feed pairs (CR LF) to indicate record boundaries but does not include form feeds (FF) to indicate page boundaries. The record length must include two bytes for the CR LF. Usually, this type of data will not be printed.
ASCII variable – Data is converted from EBCDIC to ASCII. Records can have a variable length. Although records are not padded, any trailing blanks at the end of a record are deleted. The ASCII data includes carriage return and line feed pairs (CR LF) to indicate record boundaries but does not include form feeds (FF) to indicate page boundaries. Usually, this type of data will not be printed.
Retired mode – Not used. The receive mode at this location was removed. This option serves as a place holder to enable configuration files from older versions of Barr software to remain compatible.
EBCDIC variable – Data is received as variable-length EBCDIC records. This mode prevents binary data from being padded with blanks when records shorter than 80 characters are received on the punch stream.
When you make device assignments, you can choose from several options. The available options display when you select Options from the menu line at the bottom of the Assign Devices screen.
Select Options.
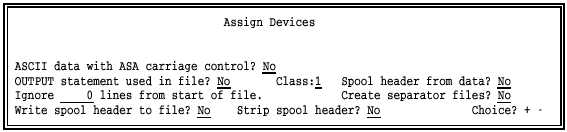
The options fall into two categories: options that affect the spool header and other options.
The options you select will affect all files received on the source device. Each time the software starts, the options from the Installation Description are used. You can change the Assign Devices options during software operation.
You might not be able to use all the options with every device or every receive mode. Just because an option displays does not mean it is valid in a given case. Additionally, in some cases, you cannot use certain options together.
You can set different options for each source device. When you assign options, keep these points in mind:
You can use options with the PR1 to PR7, PU1 to PU4, SEND1 to SEND2, and LAN1 to LAN4 source devices.
Options are not valid for the COMMAND, CON, LOG, and SPOOL1 to SPOOL8 source devices.
All the Assign Devices options except Ignore n lines from start of file and Create separator files affect fields in the Barr spool header.
File attributes from the Barr spool header display on the Print Spool screen. For more information about the spool header, see Appendix E.
ASCII data with ASA carriage control?
Choose whether to convert ASA carriage control to machine carriage control for ASCII files so you can send them to an S/370 channel printer (requires Barr PRINT370 hardware and software).
No – Do not convert ASA carriage control.
Yes – Convert ASA carriage control to machine carriage control. You must set the receive mode to ASCII. Because the file must have a spool header, you also must receive it to the print spool or write it to a file and set Write spool header to file to Yes. The software inserts a flag in the spool header and performs the conversion when you print the file.
OUTPUT statement used in file?
You can use the Barr OUTPUT statement to provide information typically used for printing a file, such as job name, form name, file name, copies, priority, and class. You insert the information in the file before it is received to the PC. Then BARR/RJE extracts it from the file, stores it in the spool header, and displays it on the Print Spool screen.
The OUTPUT statement is useful when other methods for obtaining print instructions are not available. (Do not confuse the Barr OUTPUT statement with the JCL output statement, which has a different purpose.) If the data source is a host computer, you usually can use options such as the JES2 $HASP190 message or SETUPHDR (PDIR) record to obtain this information. The OUTPUT statement is not valid for the SENDn or LANn devices.
To use this feature, you must change the program that produces
the data so it adds the OUTPUT statement to the data file.
No – Default. The OUTPUT statement is not used.
Yes – The information from the OUTPUT statement is extracted from the file and stored in the spool header. Remember to include the OUTPUT statement in the file before the file is received to the PC.
When you enable the OUTPUT statement, all lines up to and including the OUTPUT statement are deleted from the file. To prevent data loss, put the OUTPUT statement at the beginning of the file, before any data.
If the file does
not include the OUTPUT statement, all data from the file is deleted and
a warning message displays on the console.
In the OUTPUT statement, the word OUTPUT must begin in column 1, column 7 must be blank, and the keyword for the first option must begin in column 8. The statement must fit on one line in the file — it cannot wrap to the next line. If the file’s maximum line length is limited to 80 characters, you might not be able to specify all of the possible options. Use these keywords to set options in the OUTPUT statement, and substitute the option value for n: FILENAME=n JOBNAME=n FORMNAME=n FCBNAME=n COPIES=n PRIORITY=n CLASS=n DISP=n ASCIIASA=n. (You cannot abbreviate the keywords.)
Use the DISP= field to specify the disposition the file will have after it prints. To retain the file, specify DISP=R. To delete the file, specify DISP=D. Use the ASCIIASA= field to specify how to handle ASA carriage control for ASCII files you send to S/370 channel printers (requires the PRINT370 option). Specify ASCIIASA=Y to convert ASA carriage control to machine carriage control.
Specify only the options that you need. You can list the options in any order. For example,
OUTPUT FORMNAME=taxes FILENAME=taxdata
If you specify FILENAME=, its value it will be used as the Ending of file name.
You can use the Ending of file name is from file feature to obtain the file name from file text and use the OUTPUT statement to supply other options. For example, you can use Ending of file name is from file to extract the file name from the banner page and use the OUTPUT statement to assign a form name.
If you specify an invalid file name, the software assigns the file name ERROR and displays an error message on the console.
When you include FORMNAME= in the OUTPUT statement, you also must use the Barr Edit Forms feature, or the form name will be discarded. BARR/RJE searches for a user-defined form that matches the form name in the OUTPUT statement. If it does not find a user-defined form, the software displays this message:
OUTPUT statement received but form nnnnnnnn not found.
The form name in the spool header is set to blank, but any other OUTPUT statement fields are applied.
You can use the Ignore n lines from start of file option with the OUTPUT statement.
Class: n
Use this option to assign an output class to a file received on a given source device. The RJE system does not provide class information when it transfers files to a remote. The software assigns a default class and displays it in this field, but you can change the default value. The class can be a letter or number.
The specified class value is saved in the spool header, displays as a file attribute on the Print Spool screen, and can be used as part of the criteria for routing spool files to printers.
You can set a different class value for each source device. A common application is to assign the source print stream (PR1) a class value that matches the value used at the mainframe. The default classes are consecutive numbers for all devices except the RJE punch, which is assigned a letter. For example, default classes are 1 to 7 for PR1 to PR7 and S to V for PU1 to PU4.
You also can use the spool File Attribute Table screen to assign a class.
Spool header from data?
Choose whether to extract a file’s job name or form name from the file text and save it in the spool header.
This method is useful when other methods for obtaining the job name or form name are not available, although it is not as reliable or flexible as the Barr OUTPUT statement. If the data source is a host computer, you usually can use options such as the JES2 $HASP190 message or SETUPHDR (PDIR) record to obtain the job name or form name.
You can use this option to add a spool header to files received through any source device (except COMMAND, LOG, or SPOOL1 to SPOOL8) if the Receive mode is ASCII, S/370 Channel, Transparent, or PostScript.
The information to extract must occur at the same location
in every file that will be received on the same source device.
No – Default. Neither job name nor form name information is extracted from the file.
Yes – The form name or job name is extracted from a specified location in the received files and is stored in each file’s spool header. If a job name or form name is already in the spool file header (for example, from Edit Forms), it will be replaced by the value obtained from the file text.
When you press ENTER on the Assign Devices Options screen, you are prompted to select form name or job name and to specify the page, line, and column numbers where this information appears in the file text.
If a file does not contain form feeds (FF), the software will search
only the first 200 lines in the file for the specified spool header information.

When BARR/RJE extracts the name from the specified location, it does the following:
Skips leading blanks.
Terminates the file name if it detects a blank after a valid character within the column range. For example, if DAILY RPT is at the specified location, the file name will be DAILY.
In the spool header, form name or job name originates from the text, class is set from the Class option, and other fields have default values.
In
exceptional cases, you might not be able to obtain a form name or job
name from any of the usual options, including options set at the host
(JES2 $HASP190 message or SETUPHDR record) or in the Barr software (OUTPUT statement
used in file or Spool
header from data). For example, if you receive files on
the COM port the only way you can obtain the form name is from the data.
But you might not be able to change your programs to include the form
name in the data. Additionally, the form name might not be in the same
place in each of the received files, so the information supplied by Spool header from
data is not reliable.
When no other alternatives are available, you can use Spool
header from data with the
Class option to assign a one-character form name.
To do this, set Class to a unique value and set Spool
header from data to Yes with a page number of 0. The one-character Class value is used as the form name and displays
in the form name column on the Print Spool screen. You can use the one-character
form name as criteria for printing the files or to load a form overlay
file containing printer control data. Several other header options are
available, so use this special feature only as a last resort.
Write spool header to file?
When you receive data to a destination of (FILE), you can choose whether or not to include the Barr spool header in the file. The spool header contains information used for printing. Normally the header is included only in files received to the print spool.
This option is valid only for the destination (FILE) and can be set independently for each source device. Write spool header to file does not apply to files received to the print spool, because spool headers are automatically included when the destination is SPOOL. This option is not valid for files received on serial ports (COM1 to COM4).
This option is useful in these situations:
When forms are enabled at the host, but you want to omit the spool header for the destination (FILE).
To enable or disable the spool header when you are using the BARR/PRINT for LAT, BARR/PRINT for TCP/IP, or PRINT/TWINAX software options.
No – Default. The Barr spool header is not included when the destination is (FILE). Use this option if you will not print the data.
Yes – The spool header is written to all files. The header information is used only when you set the receive mode to ASCII, S/370 Channel, Transparent, or PostScript.
Strip spool header?
When you write files to disk, choose whether to include the spool header.
This option displays when you assign the destination SPOOL or (FILE)— for example, when you
direct PR1SPOOL, SPOOL1(FILE), or PR1(FILE).
The most useful application is to omit the spool header when you direct
data from a spool printer to a file — for example, when you assign SPOOL1(FILE)— so the print spool uses the header information
to route the file via a spool printer (SPOOL1), but does not preserve
the header in the final destination on disk.
If you strip the spool header when the file writes to the spool directory
(for example, PR1SPOOL), the file will have no header information
and will be assigned class Z.
This is the only option that lets you remove the spool header for PR1SPOOL and SPOOL1(FILE). For PR1(FILE), you can use this option or the Write spool header
to file option.
No – Default. Keep the spool header when you write a file to disk. This is the best choice when you intend to print the files you receive to the print spool.
Yes – Strip the spool header when you write a file to disk. This choice works best when you do not print spool files.
These options do not affect the Barr spool header.
Ignore ___ lines from start of file.
This option lets you delete a specified number of lines from the beginning of the file. The maximum value is 32767. A common application for this option is to delete the first two records of a punch file: the blank card and the file separator card.
Another way to eliminate the beginning separator records is to modify the host definition or issue a host command. For example, specify NOSEP on the JES2 Remote Printer or Remote Punch statement to eliminate separator cards between mainframe datasets. Or issue this JES2 Remote Set command at software startup:
$T PR1, S=N
This option is not valid for the SENDn or LANn source devices.
Create separator files?
Choose whether to divide an output file into multiple files by using Peripheral Data Information Records (PDIR) as file boundaries. This feature is valid only for the RJE print streams (PR1 to PR7).
RJE systems such as JES2 insert PDIRs into output files if SETUPHDR or PDIR job separators are enabled. PDIR records include job name, form name, FCB name, and copies information. These records typically occur several times in a file, usually before the banner page, the data, and the trailer page. In some instances the host computer combines multiple outputs into one file and includes a PDIR record before each set of output.
If you receive files to the print spool, and the PDIR copies
value changes within the file, the file will be divided into separate
files to allow the print spool to handle the different copy counts. This
is an automatic feature of the print spool that is not affected by the
Create separator
files option.
No – Default. Files with multiple PDIR records are not divided.
Yes – A new file is created each time a PDIR record or PDIR job separator is encountered in a received file, whether or not the PDIR information changes. Separate files are created for the banner page, trailer page, and data. More than one data file will be created if PDIR records occur several times within the data.
The BARR/RJE software allows destination devices, such as printers, to be shared, which means several source devices can write to the same destination device. Destinations often shared include LPT1 to LPT3, COM1 to COM4, and RD1 to RD4.
When you assign several sources to the same destination, the software alternates between source devices, which allows each source to write to the destination in turn. For example, if the source PR1 is ready to write a file to the destination LPT1, the software first checks to see if LPT1 is busy. If the destination device is available, the software writes the file to LPT1 and then automatically searches for another source device that is directed to the same destination. At the same time, the software can be directing other print, punch, and reader streams to other destinations.
Mainframe computers can produce print output on a print stream and plot output on a punch stream. Some printers, such as the QMS Lasergrafix, can accept both print and plot data, which allows the printer to be shared by both the print and punch source devices.
In this example, assume a printer that supports both print and plot data is attached to your PC’s LPT1 port. You will assign both PR2 and PU1 to write to that printer.
From the Assign Devices screen, select the source device PR2 and assign it to LPT1.
Select the source PU1 and assign it to the destination LPT1.
The new assignments display on the screen.
With this assignment, the software alternates between the two source
devices looking for files to send to LPT1.
First, the software looks for a file on PR1. If a file is detected, the
data is directed from PR1LPT1 until an end-of-file marker is encountered.
Then the software looks for a file on PU1
and routes it to LPT1.
The software continues alternating between the two sources.
BARR/RJE can function as a printer-sharing device for more than one host computer. This feature allows several systems to share an expensive, high-speed printer without having to use additional printer-sharing equipment.
A common application is to share a high-speed printer between a DEC VAX/VMS minicomputer and an IBM mainframe computer running MVS/JES2. The VAX is connected to a PC serial port such as COM1 to input data. The IBM mainframe inputs printer files on PR2.
Connect the VAX RS232 port to COM1 on the PC.
Enable COM1 from the Devices and Printers menu.
Under Serial Port Options, set Use this device as a data Source as well as a Destination to Yes.
From the Serial Port Source Options screen, select the desired Input mode, Length of end-of-file marker, and End-of-file marker. Select No for Card reader input.
Next, make the device assignment.
From the Assign Devices screen, select COM1 and assign it to LPT1.
Select PR2 and assign it to LPT1.
The Assign Devices screen displays the new assignments.
The software alternates between the two sources — the VAX (COM1) and the IBM mainframe (PR1) — looking for files to send to the shared printer. When a file from the VAX is input on COM1, the data is directed to the printer attached to LPT1. When the VAX job finishes, the software checks for input from the mainframe computer on PR1. Any data input on PR1 is directed to LPT1, and then the process repeats.
If you need to send large amounts of data from the VAX to the Barr PC, the BARR/PRINT for LAT option might be a better solution than the serial port. With BARR/PRINT for LAT you can receive data to the PC from up to eight VAX ports from one or more VAX computers. Also, data transfer is faster with BARR/PRINT for LAT than it is on a serial port.
On the host computer you can run programs to produce plot output and then direct the plot output to the PC as RJE printer or punch files. In the Barr software, you can assign plot output to write to a file on disk by using the destination (FILE) or to write to a plotter connected to a serial port by assigning a destination of COM1.
When you receive plot output, you must select Binary receive mode to prevent the plot files from being converted from EBCDIC format into ASCII. The files need to remain in the host computer format to print correctly. When you use Binary receive mode, BARR/RJE ignores any carriage control information in the received files.
From the Assign Devices screen, select PU1 and assign it to the destination COM1.
Select Receive mode from the menu line at the bottom of the screen.
Select Binary and press ENTER.
The Assign Devices screen reflects the new assignment:
The asterisk (*) after the destination COM1 indicates that a receive mode other than ASCII has been assigned.