The Security Configuration
dialog box is used to assign permissions to individual users or groups
of users. Permissions authorize a user or group to perform actions within
specified areas of Barr EOM. Without the appropriate permissions, attempts
to carry out those actions are blocked.
To configure security for the EOM Console, you must be assigned the
Allow user to Configure Console Security
permission or be added to the security during the Barr EOM installation.
Users added to the security during installation are considered administrators
and are assigned all permissions by default.
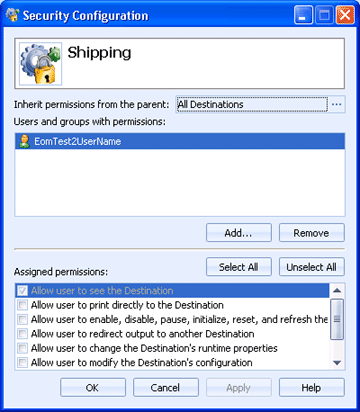
Complete the following steps to assign permissions for the EOM Console.
From the Users
and groups with permissions list box, select the appropriate user
or group in the list. The Assigned permissions
list box will display the assigned permissions for the selected user.
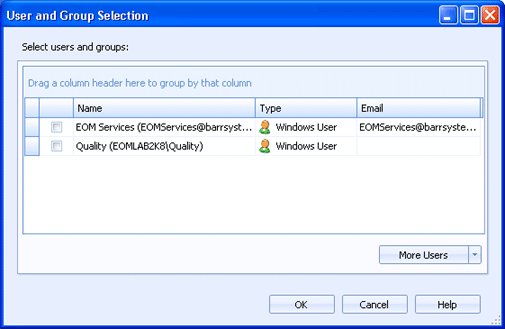
If you want to set permissions for a user or group that
does not appear in the list, click Add.
From the User and Group
Selection dialog box, select the users/groups you want to add and
click OK. If the user/group is
not listed, click More Users and
then click the type of user you wan to add, EOM users, LDAP users, or
Windows users. You can also choose to import LDAP users. See the Adding
users and groups to Barr EOM topic for detailed procedures on adding
users. Once users are added, they are placed in the EOM database, causing
them to always be listed in the future.
From the Assigned
permissions box, select or clear the appropriate permissions. Click
Select All or Unselect
All to easily assign or remove all permissions.
To assign initial permissions that will
allow users to open the EOM Console and view the Destinations, Sources,
and Documents applications, select the Allow
user to run the EOM Console, Allow
user to access the Destinations Application,
Allow user to access the Sources Application,and Allow user to access the Documents
Application permissions. For information on assigning security
for Destinations,
Sources,
and Documents,
see the appropriate help link.
Once all
of your permission changes are complete, click OK.

 To assign initial permissions that will
allow users to open the EOM Console and view the Destinations, Sources,
and Documents applications, select the
To assign initial permissions that will
allow users to open the EOM Console and view the Destinations, Sources,
and Documents applications, select the 