Administration
Use this tab to add, remove, and manage groups of users. You can configure an email address for the group; specify a quota management profile to disable printing for a group under certain circumstances; and set a print balance for a group to control costs.
Click an option you want to learn more about.

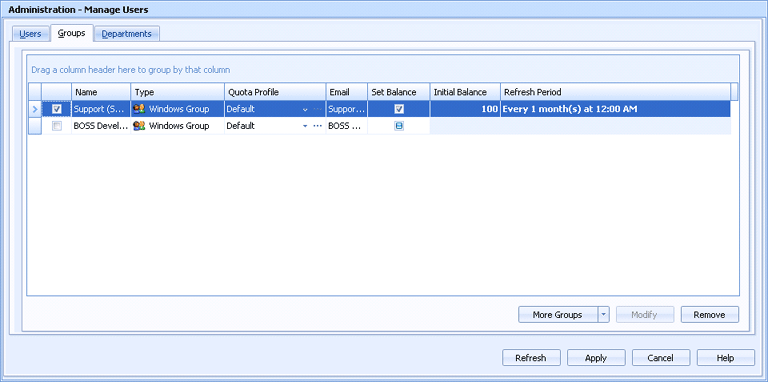
From this grid, you can add and manage groups of users.
Name – Specifies the name of the group of users.
Type – Indicates whether this group is an EOM group, an LDAP group, or a Windows group.
Quota Profile – Specifies the name of the quota management profile assigned to this group. The quota profile sets up restrictions based on the type of document, for example, precluding color printing and requiring that documents be duplexed. It is not required that all users in the group use the quota profile assigned to the group.
To select a profile, click the cell and select a profile from the list. To manage profiles, click the Browse button to display the Manage User Quota profiles dialog box.
Email - Specifies the email address for this group.
Set Balance - Indicates whether a print allowance is assigned to users in this group. It is not required that all users in the group have an allowance or that they have the same allowance. From the Users tab, you can specify that a user not be governed by inheritance, that a user be assigned an unlimited balance (by not selecting Set Balance), or that a user have a different balance than the group.
Initial Balance - Specifies the print allowance for the group at the beginning of an accounting period. It is not required that all users in a group have the same initial balance. From the Users tab, you can specify that a user not be governed by inheritance, that a user be assigned an unlimited balance (by not selecting Set Balance for that user), or that a user have a different initial balance from the group. In addition, if you reset the initial balances of all group members, you can then choose whether to reset the remaining balances.
Refresh Period - Specifies the number of days in an accounting period.
If the group to which you want to assign quota settings is not listed, click More Groups to add that group. Once groups are added, they are placed in the EOM database and will always be listed in the future. Choose one of the following options from the list:
Add EOM Group- Displays the EOM Group dialog box for adding EOM users.
Add LDAP Group- Displays the LDAP Group dialog box for adding LDAP users.
Add Windows Users and Groups - Displays the Select Users or Groups dialog box for adding Windows users and groups.
Import LDAP Users and Groups - Displays the LDAP Import Utility for importing LDAP users.
Depending on the type of group selected, displays the EOM Group dialog box or the LDAP Group dialog box so that you can change information. You cannot modify a Windows group from the EOM Console; you must modify it from the Windows operating system.
Deletes the selected group.