 To reach the Print Spool screen, press CTRL, ALT, and
P from any screen.
To reach the Print Spool screen, press CTRL, ALT, and
P from any screen.From the Print Spool session, you can drive multiple printers from a single print queue. Even if your mainframe computer supports only one printer stream, the print spool can drive up to eight printers from your PC. Printing can begin right away, without waiting for the end of the file to be received.
If you have not already set up the print spool, see Chapter 9, Print Spool Description, for instructions.
After you use the Print Spool Description options to enable spool features and the Assign Devices options to specify which printers to route spool files to, you can begin spool operation.
During print spooling, files received from the host or LAN are stored in the spool directory. File attributes such as form, class, and priority are included in each file’s spool header at the time they are received. BARR/RJE uses these attributes to determine which printer to route each file to and in which order to print them. A file is routed to a printer when the file’s attributes match the attributes of one of the spool printers. You can control how files are routed by changing printer and file attributes on the Print Spool screen.
After a file prints, BARR/RJE removes it from the print spool directory and the Print Spool screen. You can keep a backup copy of spool files by defining a retain directory. BARR/RJE moves files from the spool directory to the retain directory after they print. You can reprint or delete the retained files from the Restore screen.
The Print Spool screen lets you control printing. This screen lists the files in the print spool, displays information about those files, and provides information about printers assigned to the spool.
 To reach the Print Spool screen, press CTRL, ALT, and
P from any screen.
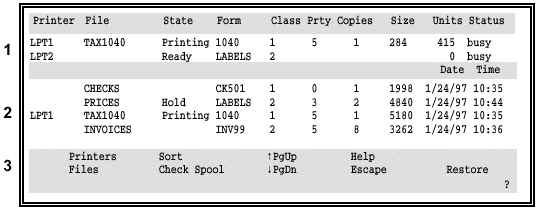
The Print Spool screen has three distinct parts:
1 Spool Printers – List of printers assigned to the print spool and their printer attributes
2 Spool Files – List of files to be printed and their attributes
3 Command Menu – List of the available spool commands
Column headers identify printers, files, and their attributes. The rest of this chapter describes how to use features of the Print Spool screen to manage your print files.
Typically, you will print files in batches according to the forms paper they require. When you are ready to release files for printing, follow these basic steps:
Review the list of files on the Print Spool screen and decide which form to print next.
Load the corresponding forms paper on the printer.
Use the Printers command to change the spool printer’s form attribute, and then press ENTER.
Repeat these steps for each spool printer you have defined.
When a spool printer is available, the print spool selects files based on their attributes. A file is eligible for selection if these conditions are met:
The file’s state is Ready.
The file’s form name matches the printer’s form name.
The file’s class matches the printer’s class.
Files print in the same order as they display. You can control the display and print order with the Sort command described later in this chapter. If the attributes for more than one file match the spool criteria, the file with the highest priority is selected first. Additionally, a file that has already been received is selected before a file that is still being received.
As soon as a file is selected, printing begins. While a file prints, its file name displays at the top of the screen next to the printer on which it prints. Additionally, the file state is updated in the file list.
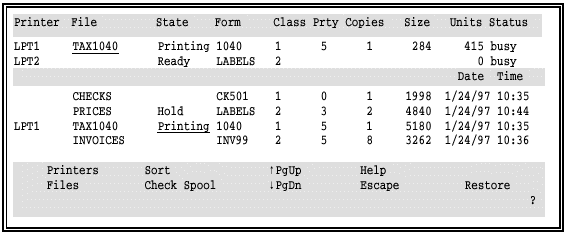
In this example, the TAX1040 file is printing on LPT1. In the spool printer list, TAX1040 displays in the file column. In the file list, Printing displays as the file’s state.
You can use the Printers and Files commands to set the file and printer attributes that control print spooling, as described in the rest of this chapter.
Printer attributes reflect the spool printer’s status and control which files are selected for printing. You can change each spool printer’s state, form, and class.
State
Current status of the spool printer.
Ready – Spool printer is ready but no files can be selected because printer form and class do not match any file’s form and class.
Printing – Spool printer is ready and a file is printing.
Draining – Spool printer is printing a file. After the file prints, the printer’s state is set to Disabled.
If the file’s copy count is greater than one and you set the printer state to Draining, all the copies might not print. After the current copy finishes printing, the printer state is set to Disabled and the file state is set to Hold.
Disabled – Spool printer is not ready. No files will be selected.
Reprint – When the printer is in the reprint state and a file is selected, the Reprint screen shows the contents of the file, beginning at the last line printed. You can position the file by scrolling forward and backward or by specifying a page number. From the Reprint screen, you can use commands to restart printing at the new position or to disable the printer. See section 24.7 for more information about reprinting files.
Form
The name of the form mounted on the printer. For a file to print, the form name on the spool printer must match the file’s form name. When you specify a spool printer form, you can use the DOS wildcard characters * and ?. A ? in the form name allows any character to occupy that position. For example, FORM=JUN??9? matches any form that begins with JUN and has a 9 as the sixth character. An * in the form name allows any character to occupy that position and all remaining positions in the name or extension. For example, FORM=MAY* matches all form names starting with MAY. For more information about DOS wildcards, see the discussion about global file name characters in your DOS manual.
If the form attribute field contains only an asterisk (*) all files can print regardless of their form name.
Class
A one-character, alphanumeric printer class used to control file selection. For a file to print, the printer’s class must match the file’s class. You can enter up to five classes for each printer. (Each of the five characters represents a separate class.) If you do not specify a printer class, class is not used for file selection.
Units
Cumulative total number of lines or pages printed. You can control whether this column displays the number of lines or the number of pages with the Display count of lines or pages option.
Status
Physical printer status. See section 20.2 for more information about the physical printer status.
The spool header added to each file contains attributes that describe the file and specify how it is to be printed.
You can change a file’s state, form, disposition, class, priority, and copies attributes from the Print Spool screen. BARR/RJE writes your changes to the spool header, so your changes are preserved if you exit the software before your files print. Typically, you do not need to change any file attributes or you only need to change the copies attribute.
When you change the form attribute, you are changing only one part of a file’s form information. Modifying the form attribute only changes the form name in the spool header. Form information included at the time the file is received consists of more than just the form name. For example, a form usually also includes lines-per-form and lines-per-inch settings. In most cases, if a file is received with an incorrect form, it must be received again with the correct form to ensure that all the form information is correct. However, there are two cases when changing the form attribute on the Print Spool screen is helpful:
When you use form overlay files, the form name is used to trigger the overlay file. If you need only an overlay file and not a form definition, changing the form attribute has the desired results — it sends the correct overlay file.
If form information is stored in the printer (instead of the spool header) and the form attribute in the file is used to trigger the form name in the printer, changing the form attribute on the Print Spool screen results in the use of the correct form definition from the printer. For example, this method is useful with Xerox laser printers that store forms in the printer.
This section describes the file attributes that display on the Print Spool screen and how they can affect the print spooling process. You can change all the file attributes except size, date, and time.
You can view a list of all the attributes from the spool header with the View Header or View File commands, as described later in this chapter. See Appendix E for a complete list of file attributes and the methods you can use to set the value for each attribute.
State
Current status of the file. You can use this attribute to control which spool printer is selected to print a file.
Ready – File can be selected for printing.
Hold – File will not be selected for printing.
If only a portion of a file is received, the software automatically sets the file state to hold. This prevents incomplete files from printing. Other error conditions might also set the file state to hold.
Delete – File will be deleted.
Error – An error occurred while writing to the retain directory. Verify that your spool and retain directories are on the same hard drive.
Retry
– When you direct files from the print spool to a NET device (SPOOL1 NET1), if a file transfer fails, the file state
is set to Retry, and the priority is decreased by 1. The print spool tries
to print the file again after the interval you specified on the NET Options
screen.
Disposition
Indicates whether the file will be deleted or retained after printing. If the file is to be deleted, a hyphen (-) character appears to the right of the file state. If the file is to be retained, a blank character appears to the right of the state. Files are retained in the directory specified on the Print Spool Description screen. If a retain directory name was not specified, files are retained in the root directory.
Form
Form name. The form often indicates pre-printed paper forms that must be mounted on the printer. You can use this attribute to control which spool printer is selected to print a file.
FCB
FCB name. (Display of this attribute depends on your Print Spool Description settings.)
Class
A one-character, alphanumeric printer class that you can use to group files. You can use this attribute to control which spool printer is selected to print a file. You can use Barr software options to assign a class value to files received from the host. Files without spool headers that are copied into the spool directory from DOS are assigned class Z.
Prty
Indicates the print selection priority. Values range from 0 to 9, with 9 as the highest priority.
Copies
Number of copies to print.
When the spool prints multiple copies, the copies value decrements by one as each copy is printed. For example, if the original copy value is 5, the copies value changes to 4 after the first copy prints.
If the copies value is greater than one, and the printer state is set to Draining before all the copies are printed, the current copy is completed, the copy number is updated, and then the printer state is set to Disabled.
If you use the print spool to direct files to other locations on disk, you might want to route only one copy of those files. If the received files have a copies value greater than one, you can set up the software to send only one copy with the Assign Devices Strip spool header option. (This feature does not work for files directed to printers.)
Size
Number of bytes in the file. As the file prints, the size field decreases, indicating the number of bytes remaining. The display can show a maximum file size of over 2.14 billion bytes.
Date
Date the PC file was created.
Time
Date and time the PC file was created.
To change file and printer attributes, use the spooling commands at the bottom of the Print Spool screen.
The command menu lists the keys you can use to control print spooling. This section briefly describes each command. The rest of this chapter provides more information about each command.
Printers
Change printer attributes.
Files
Manage files. You can change file attributes, view files, view a file’s spool header, and delete files. If you see Ready Files instead, the only file management task you can perform is to change the file state from hold to ready.
Sort
Control the file display and print order.
Check Spool
Update the print spool display after adding DOS or LAN files.
Restore
Reprint a file from the retain directory.
If you receive a host file that contains PDIR job separators, you might see several files on the Print Spool screen, although you expect to see only one file. If the host uses different PDIR information in different portions of a file, it includes several PDIR job separators in the print file. When you receive one of these files to the print spool, BARR/RJE divides the single host file into several files, with PDIR records as file boundaries.
This enables BARR/RJE to preserve any unique form information in a separate spool header for each file.
The spool header contains a group code that enables BARR/RJE to group these files and print them in the correct order. If you change attributes for one of the files in such a group, BARR/RJE applies the change to all of the files.
When you start BARR/RJE, the spool printer attributes get set to the values you specified on the Printer Initialization screen. You can use the Printers command to change printer attributes that control how files are directed to spool printers. For example, if you load pre-printed forms for printing checks on printer LPT1, change LPT1’s form attribute to CHECKS on the Print Spool screen. This tells BARR/RJE to route files with the form name CHECKS to LPT1. It also prevents files that require other forms from printing on LPT1 while the special forms paper is loaded.
You can change a spool printer’s state, form, and class. Follow these steps to change printer attributes.
Select P for the Printers command.
The cursor moves to the list of printers at the top of the screen, and the message Spooling paused flashes in the lower-left corner of the screen to remind you that all spool activity stops while you are using the Printers command.
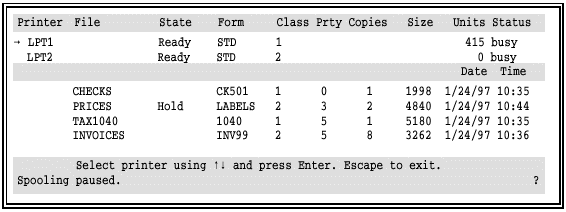
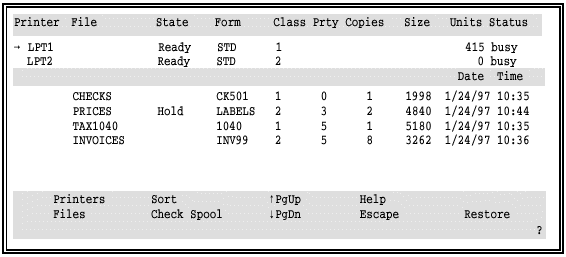
Select a printer by using the UP ARROW and DOWN ARROW keys. A blinking arrow displays next to the current printer.
If more than one printer is listed, press ENTER to select a printer before you make any changes.
Move among printer attributes by using the LEFT ARROW, RIGHT ARROW, or TAB key.
Make any changes to the printer attributes.
Press ENTER to preserve the changes when you are done.
Use the Files command to reach the Files menu. From the Files menu, you can change file attributes, view a file, view a spool header, and delete files.
Select F for the Files command.
The cursor moves to the first file in the list, and the Files menu displays at the bottom of the screen.
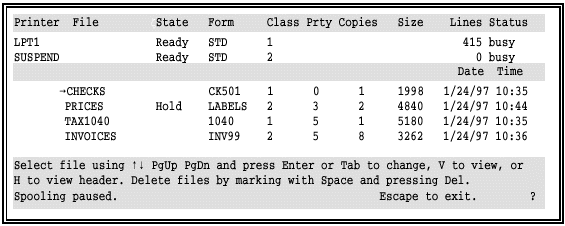
The message Spooling paused flashes in the lower-left corner of the screen to remind you that all spool activity stops while you are using the Files command.
Use the arrow keys to select a file. Then select a command from the menu.
If you see the Ready Files command instead of the Files command, the command menu will look like this:
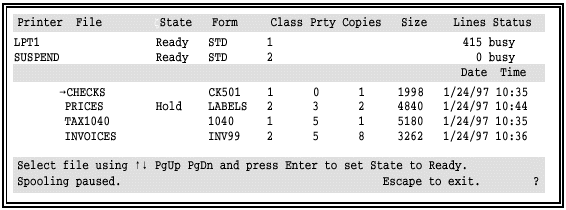
 Select a file that is on Hold and press ENTER to change
the state to ready (blank).
If the command menu displays the Ready Files command, you cannot use any of the other features described in this section.
Use the View File command to view a file.
Select V to view the selected file.
The text of the file displays on the screen:
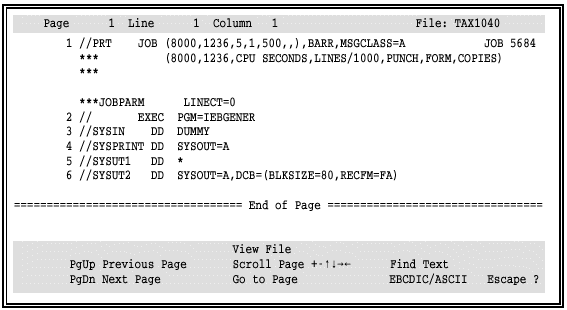
The View File menu at the bottom of the screen lists the keys you can use to browse the text in the file. These keys are similar to the keys you use for the reprint commands described in section 24.7.
The top line of the screen indicates the current page, line, and column positions of the file. These numbers are updated as you scroll through the file.
 If the file contains line overprint instructions, the overprinted
lines might appear as separate lines on your screen, but the file will
still print correctly.
Press ESC once to return to the Files command menu or twice to return to the Print Spool screen.
The spool header contains information that BARR/RJE converts to printer instructions and sends to the printer before the file. Some of the fields from the spool header display as file attributes on the Print Spool screen. If you want to see all the attributes, use the View Header command.
You might want to view the spool header in these situations:
Before you print the file, so you can determine printer settings such as lines-per-inch.
After you print the file, to determine why a file did not print as expected.
Because the spool header is not part of the printable text, you must view it separately from the file text. The View Header command displays the spool header exactly as it appears in the file. The header includes any changes you made to it from the FAT or Print Spool screen.
 The View
Header command displays only the first 132 lines of carriage
control information from the spool header.
Follow these steps to view the header:
Select H to view the spool header for the selected file.
The text of the spool header displays on the screen:
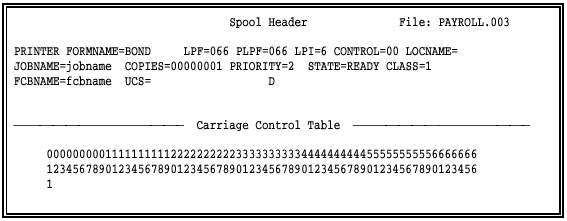
For a detailed description of the spool header fields, see Appendix E.
Press ESC once to return to the Files command menu or twice to return to the Print Spool screen.
You can use the Files command to change the state, class, priority, and copies attributes for a file.
Select a file by using the UP ARROW and DOWN ARROW keys. A blinking arrow indicates the current file.
Move among file attributes by using the LEFT ARROW, RIGHT ARROW, or TAB key.
Change the file attributes.
Press ENTER to store the changes, or press ESC to cancel the changes.
Press ESC once to return to the Files command menu or twice to return to the Print Spool screen.
You can change the attributes for a group of files by first marking the desired files.
Select a file using the UP ARROW and DOWN ARROW keys. A blinking arrow indicates the current file.
Press SPACEBAR to mark the files. A checkmark displays next to marked files.
Change the attributes for one of the marked files.
Press ENTER to store the changes.
At the Apply changes to all marked files prompt, select Yes.
Press ESC once to return to the Files command menu or twice to return to the Print Spool screen.
Files are automatically deleted from the spool directory after they print. If you want to delete a file before it prints, mark the file and then delete it with the DELETE key.
Select the file using the UP ARROW and DOWN ARROW keys. A blinking arrow indicates the current file.
Press SPACEBAR to mark the file. A checkmark displays next to marked files.
Press DELETE to delete the file.
Choose whether to delete the marked or unmarked files, or press ESC to cancel.
Press ESC once to return to the Files command menu or twice to return to the Print Spool screen.
You can use the same method to delete several files at once. First mark all the files to be deleted, and then press DELETE.
The Sort command controls the file display order and print order. Files are displayed and printed according to the same criteria. The Sort command also provides information to help you manage PC disk space. It displays the number of files in the spool directory, the amount of space used by those files, and the amount of available space.
You can use four sort fields to set the file display and print order. Files are sorted by the first field, and then subsorted by the remaining three fields. By default, files are sorted by the sort criteria you specify on the Print Spool Description’s Advanced Spool Options screen. The default criteria are used each time the software starts.
You can sort files by their priority, class, file name, size, form, date, and time attributes, as described in section 9.4. For example, you can print all small files before large files by specifying ascending file size (Size > ) as the first criteria of the sort order. To print large files first, specify descending size (Size < ).
Follow these steps to use the Sort command.

From the Print Spool screen, select S for the Sort command.

Move between sort fields with the RIGHT ARROW key.
Select an attribute to sort by with the PLUS SIGN or MINUS SIGN key.
Set any unused criteria to blank.
Press ENTER when you are done.
The Check Spool command immediately updates the print spool display with files copied from DOS or a LAN. BARR/RJE automatically checks the spool directory for new files every 300 seconds (or at the time interval you specify on the Print Spool Description’s Advanced Spool Options screen).
You can use either the DOS copy command or one of these Barr tools to add PC and LAN files to the spool directory:
Move command
PRT utility
The Barr PRT utility is the preferred method because it builds a spool header and lets you set attributes for the file, unlike the Barr move command or DOS copy command. See Chapter 25 for more information about the PRT utility.
The Barr move command requires the file source and destination directories to be on the same hard drive. It eliminates copy time because it changes the file location by renaming the directory portion of the file name. Unlike the copy command, the Barr move command does not replace a file that has the same name, unless you explicitly specify to do so. (The move command for MS-DOS version 6.0 automatically overwrites existing files.) If a file with the same name already exists in the directory, an error message displays. The MOVE.EXE file comes with the BARR/RJE reference files. You can run it from a DOS prompt as follows:
move/[d] path1\file1 path2\file2
where the optional /d parameter specifies to overwrite a file with the same name, path1\file1 specifies the source path, and path2\file2 is the destination path. For example, you can move TESTFAST.JOB from C:\BARR\REF to C:\SPOOL without overwriting a file of the same name with this command:
move c:\barr\ref\testfast.job c:\spool\*.*
Use the Check Spool command if you cannot wait for the automatic update of the print spool display.
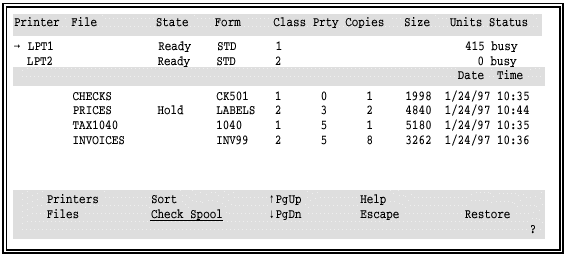
 Select C for the Check
Spool command.
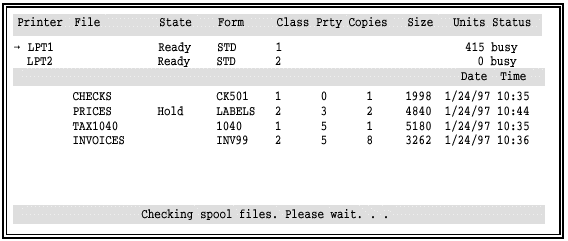
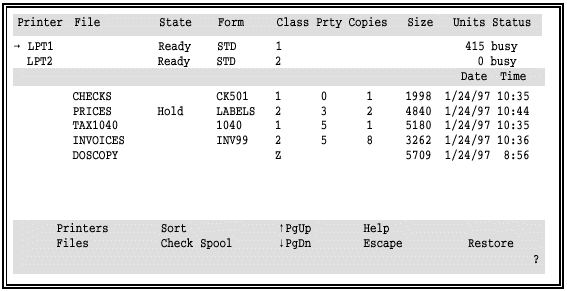
BARR/RJE checks for files copied into the print spool and updates the Print Spool screen with any new files, as shown on the next screen.
If you specify a retain directory on the Print Spool Description screen, you can reprint files that have been deleted from the spool directory. (Files are automatically deleted from the spool directory after they print or when you use the Delete command.) Use the Restore command to restore a file from the retain directory to the print spool. Then print the file with the normal spooling commands.
The Restore command lets you manage files in the retain directory. You can view, mark, sort, select, and delete files.

 From the Print Spool screen, select Restore to display the Restore
screen.
 Restore
appears as a command choice only if you define a retain directory on the
Print Spool Description screen. If Restore
does not display on your screen, verify that you defined a retain directory.
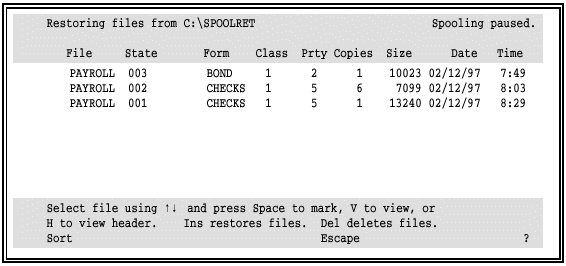
The message Spooling paused flashes in the upper-right corner of the screen to remind you that all spool activity stops while you are using the Restore command. When you return to the Print Spool screen, a blinking arrow marks the first file in the files list. Spooling remains paused so you can change file attributes for the restored file. Spooling resumes when you finish changing attributes for the restored file and exit the files list.
The menu at the bottom of the screen lists the keys you can use. You can sort files, view files or spool headers, mark files, and delete files. These operations are similar to ones you perform from the Print Spool screen. Two operations are unique to this screen: you can restore files and display file attributes for individual files.
Follow these steps to restore a file to the spool directory:
Select a file with the UP ARROW and DOWN ARROW keys.
Press the SPACEBAR to mark files to restore.
Press INS to restore the selected files.
Press ESC to return to the Print Spool screen.
Change file attributes for the restored files, if necessary.
Press ESC to resume spool operations.
On the Restore screen, you might need to display file attributes to identify which files to reprint. If you have disabled the automatic display of file attributes to improve Restore screen performance, you can use either the View File or View Header commands to display the attributes for individual files. After you use one of these commands, the Restore screen displays the attributes for the selected file.
The following example shows you how you can use the View File command to display attributes for a file.
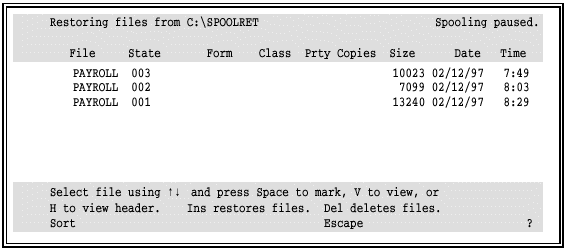
Move the cursor to the desired file.
Press V to view the file.
After you view the file, press ESC to return to the Restore screen.
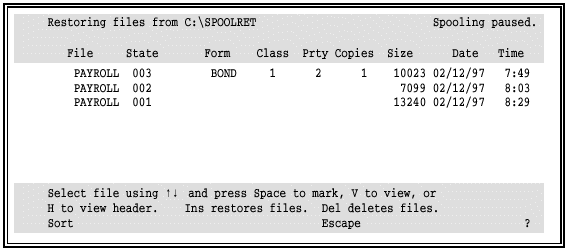
The form, class, priority, and copies attributes for the selected file display on the screen.
You can use the reprint feature to do the following:
Print a portion of a large file.
Backspace after a paper jam or other error.
Print another copy of a file after it was retained.
To use the reprint feature, the file must be in the spool directory. If you want to reprint a file from the retain directory, you must first restore it to the spool directory with the Restore command described in section 24.6.
If you cannot locate a file in the print spool or in the retain directory, it was deleted. To reprint it, you must send it again from the original source to the spool directory. If a backup copy of the file exists, you can copy it to the spool directory as described in section 24.5.
You can set up the software to display and log console messages about reprint activity. Then you can use the log as an audit trail. See sections 10.6, 10.7, and 21.7 for more information about logging spool console messages.
To reprint a file, you must set the printer state to Reprint and select the file. You can select a file if its state is Ready, its form is on the printer, and its class matches the printer class. When these conditions are met, the Reprint screen displays.
The Reprint screen allows you to view or reposition a file before printing resumes. Follow these steps to reprint a file:
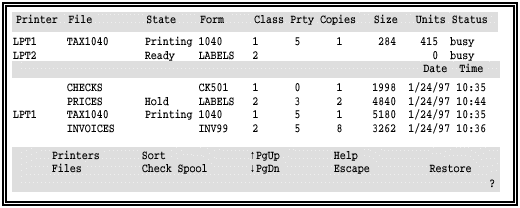
Press P to reach the printer attributes.
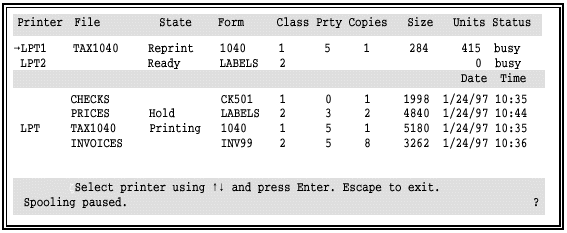
Select a printer with the UP ARROW and DOWN ARROW keys. A blinking arrow indicates the current printer.
Select the printer’s state field, and change the state to Reprint.
Change the printer’s form and class attributes to match the form and class of the file you want to reprint.
Press ENTER.
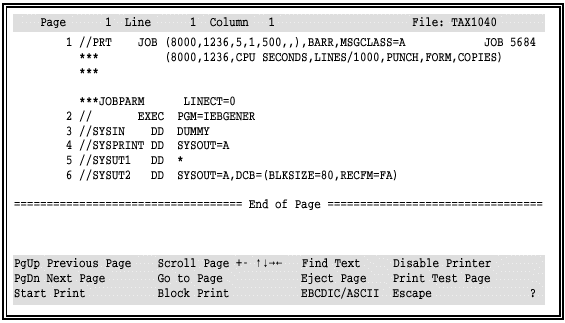
The text of the selected file displays on the screen.
Use reprint commands to position the file for reprinting and start printing it on the selected printer.
Use the reprint commands to select the starting point for the reprint operation.
In some cases, the software automatically records where it stopped printing, so you might not have to manually reposition a file. After a file starts printing, if you put the file on hold or the software puts it on hold because of an error condition, BARR/RJE stores the reprint repositioning information in the file’s spool header. It uses this information to determine where reprinting should start when printing resumes. When you set the file and printer for reprint, BARR/RJE automatically repositions the file to the top of the page where printing stopped.
 If the file has no page breaks, BARR/RJE repositions it to
the line immediately before the one where it stopped printing. (If BARR/RJE
does not locate at least three page breaks within the first 600 lines
of the file, it treats the file as if it has no page breaks.) From there,
you can use commands to position the file to the desired reprint start
point.
For optimum reprint repositioning for large files, enable the Save fast reprint repositioning option on the print Spool Description’s Advanced Spool Options screen.
Reprint commands display at the bottom of the Reprint screen.

The menu lists keys or options you can use to view or print files.
PgUp Previous Page
Display the previous page.
PgDn Next Page
Display the next page.
Scroll Page +-

The left-most columns of the current page display on the screen. To see the complete page, use the arrow scrolling keys. The PLUS SIGN and MINUS SIGN keys scroll one screen at a time. The UP ARROW and DOWN ARROW keys scroll one line at a time. The RIGHT ARROW and RIGHT ARROW keys scroll 10 columns at a time.
Go to Page
Move to a specific page number. You are prompted to enter the number of the page you want to view.

If the file contains no form feed characters, you are prompted to enter the number of the line you want to view.

Find Text
Search for text. You can enter a search string of up to 25 characters. You can also search text beginning only in a specified column of each line, or you can search entire lines.

EBCDIC/ASCII
View file contents in either EBCDIC or ASCII. This option enables you to view files in the S/370 channel format.
Press B to view contents in EBCDIC (S/370 files).
Press A to view contents in ASCII.
Start Print
Reprint the file.
Block Print
Print a block of text within a specified page range. Specify the first page and last page to reprint. If you do not specify a Last Page, the Last Page defaults to the same value as the First Page, which causes only one page to print.

If the file contains no form feed characters, you are prompted to specify the first line and last line to print within the file. If you do not specify a Last Line, the Last Line defaults to the value in First Line, which causes only one line to print.

 If the file’s copies count is greater than one, the software
will print the specified number of copies of the selected block when you
use the Block Print feature. If you only want to print one copy of a block,
set the file’s copies count to 1 before you select the Reprint state.
Eject Page
Advance the printer to a new page.
Disable Printer
Change the printer state to Disabled and the file state to Hold.
Print Test Page
Print the current page and advance to the next page. You can use this option to verify that data is printing correctly on a form. If the test page prints incorrectly, you can change the form alignment and print another test page. When the test page prints correctly, you can continue to print the rest of the file.
You can view an external FAT file from the Print Spool screen. If you create an external FAT file (as described in section 9.6), the external FAT file is loaded into extended memory (XMS) when the Barr software starts. FAT entries are applied to files as they are placed in the Print Spool. The applied changes are written to the spool headers for each file.
When you make changes to the external FAT file, the changes only affect files that have not yet been received. Files already in the Print Spool will not be affected. (You can change attributes for files that are already in the spool directory from the Print Spool screen.)
Before you use a newly created or modified external FAT file, you should view the table and check for errors. Also, whenever you encounter problems with spool files affected by the FAT, you can use the viewing feature to help diagnose them.
 After you edit the external FAT file, you should disable the
spool printers. This will prevent any files from printing while you check
the FAT table and resolve any errors. You can enable the printers after
you verify that the external table is working correctly.
Follow these steps to view the FAT table:
From the Print Spool screen, select Check Spool.
The following prompt displays at the bottom of the Print Spool screen. The prompt includes the path and file name for the external FAT file:

Set Display SPOOL FAT entries to Yes.
BARR/RJE displays the entries from the FAT file in an easy-to-read table format.
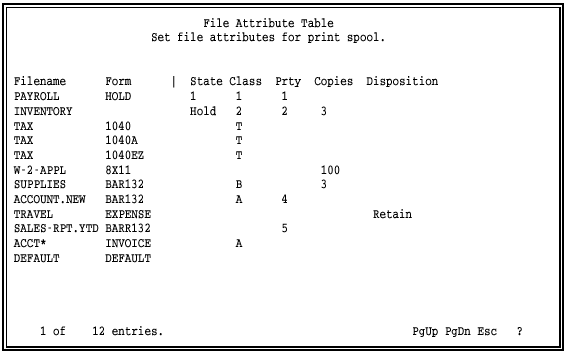
This sample table contains an error on the first entry line. See Diagnose and Correct Errors later in this section for more information about detecting and resolving table errors.
In the lower-left corner of the screen, the software displays the number of table entries and the number of the entry that is at the top of the screen. The top entry number is updated as you scroll through the table.
Use these keys to view the FAT table:
PAGE UP and PAGE DOWN scroll through the table entries.
ESC returns to the Print Spool screen.
For each FAT entry, check that all fields display and that the fields display in the correct columns. Missing or misplaced fields indicate that you omitted comma delimiters. For example, the first entry of the example FAT table is missing a comma at the end of the file name or as a place holder in the Form column. This causes the HOLD state to shift one column to the left and display in the form column.
You can only view table entries from this screen. To correct table entries, you must edit the external FAT file (see section 9.6) and then refresh the FAT table (see Refresh the FAT later in this section).
Other types of errors might prevent the File Attribute Table screen from displaying. Instead of the table, this message displays at the bottom of the Print Spool screen:

Press ESC to clear the message text.
Switch to the console portion of the Operation screen and look for any error messages that reference the spool FAT.
Typically, several messages display. The first message usually is as follows:
Error opening SPOOL FAT file
Subsequent messages contain information you can use to resolve the error. For example, if this message displays next,
DOS ERROR: file not found
check whether you specified the correct name and file path for the external FAT file on the Print Spool Description’s Advanced Spool Options screen.
Each time you start the Barr software, it automatically applies any FAT file changes.
If you modify the FAT file from a background DOS session while BARR/RJE is running, you must use the Check Spool command to immediately apply the changes. The software will not apply the FAT table changes to incoming files until you issue the Check Spool command. You do not have to view the FAT file (by setting Display Spool FAT entries to Yes) for the changes to take effect, but you should view the changes to check for errors before you resume spool operations.
 During software operation, your PC might not have enough memory
for you to edit the FAT file from a background DOS session.