 If you have been assigned
the Document - Rights Override
right in the User Rights Configuration utility, the document rights do
not apply. Your rights are based on the global rights assigned with the
User Rights Configuration utility.
If you have been assigned
the Document - Rights Override
right in the User Rights Configuration utility, the document rights do
not apply. Your rights are based on the global rights assigned with the
User Rights Configuration utility. By default, each document sent to the spool will be assigned all document rights. Document rights are actually fields within the Data Set Header Internal Custom Section. To remove document rights, the value of each field must be set to -1. For example, to remove the right to modify the priority of documents, set the NDHBDOCMOD and NDHBDOCPRI fields equal to -1.
You can remove rights from documents when they enter the spool by using an override table or by configuring document attributes in Print Utility. Removing document rights allows you to enforce rights on each individual document as an extension of the individual user’s global rights assigned with the User Rights Configuration utility. It is important to remember that the document rights override the global rights. That is, if you grant users the global right to view documents with the User Rights Configuration utility, they will only be allowed to view the documents that do not have the NDHBDOCVUE right removed.
If you have been assigned
the Document - Rights Override
right in the User Rights Configuration utility, the document rights do
not apply. Your rights are based on the global rights assigned with the
User Rights Configuration utility.
Review the following list of document rights.
|
NDHBDOCDEL - Doc. Delete |
NDHBDOCPRI - Doc. Priority |
|
NDHBDOCHOL - Doc. Hold |
NDHBDOCVUE - Doc. View |
|
NDHBDOCCOP - Doc. Copy Count |
NDHBRETDEL - Retained Doc. Delete |
|
NDHBDOCMOD - Doc. Modify |
NDHBRETRST - Retained Doc. Restore |
|
NDHBDOCPRG - Doc. Page Range |
|
The NDHBDOCMOD - Doc. Modify right controls
the modification of all document settings except the document priority,
copy count, and page range. The Doc. Modify right must be specified
along with the NDHBDOCPRI
- Doc. Priority, NDHBDOCCOP
- Doc. Copy Count, and NDHBDOCPRG
- Doc. Page Range rights to control these settings.
Use one of the following procedures to remove document rights.
You can use override tables to remove rights from documents as they are being sent to the spool. To remove document rights, you must create an action statement that assigns a -1 value to the appropriate document right contained in the Data Set Header Internal Custom section. You can either create a new override table or modify an existing override table by adding the appropriate action statement.
Complete the following steps to create an override table that removes rights from documents when they enter the Spool Window.
To
perform these tasks, you must have the appropriate user
access rights.
Because the document rights fields are stored in the Data Set Header Internal Custom section, you must create a Data Set Header override table.
Open the Configuration Utility.
From the Override Table tab, click Add to create a new override table. The New Override Table dialog box displays.
Enter a name for your override
table and click OK. The Rules
Editor dialog box displays. 
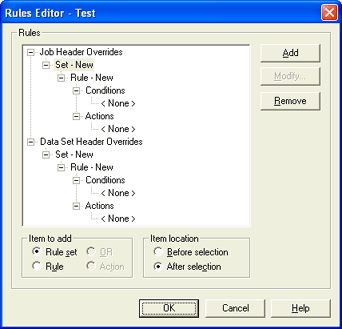
In the Rules box, select Data Set Header Overrides and click Add.
If you want the action to apply to all jobs, leave the condition blank and skip the following steps.
In the
Rules box under Conditions,
select <None>, and then
click Modify. The Rule Conditions dialog box displays.
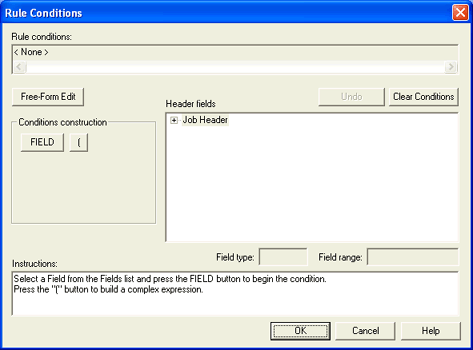
In the Header fields box, click the plus sign (+) next to Job Header or Data Set Header.
Click the plus sign (+) next to the appropriate section and select a field from the list. For example, in the Data Set Header General Section, select NDHGCLAS - Class.
Under Conditions construction, select FIELD.
Select an operand (=, !, <, >).
Select a field or value to complete the expression. Select FIELD or VALUE as appropriate. Complex expressions can include an AND or OR condition. Remember to use parentheses to separate statements. For example, (NDHGCLAS=A) OR (NDHGPRIO=1).
Click OK to return to the Rules Editor dialog box. Refer to the Instructions box at the bottom of the Rule Conditions dialog box for further explanation.
To remove document rights, you must select one of the document rights fields in the Data Set Internal Custom Section and set the value to -1.
In the Rules box under Actions, select <None>.
Click Modify.
The Rule Actions dialog box
displays.
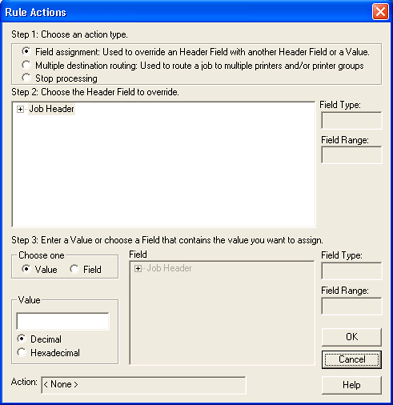
Select Field Assignment (Used to override a header field with another header field or value).
In the Step 2: Choose the Header Field to override box, click the plus sign (+) next to Data Set Header.
Click the plus sign (+) next to Internal Custom Section. Scroll down and select the appropriate document right field (for example, NDHBDOCDEL - Doc. Delete). The NDHBDOCMOD - Doc. Modify right controls the modification of all document settings except the document priority, copy count, and page range. The Doc. Modify right must be removed along with the NDHBDOCPRI - Doc. Priority, NDHBDOCCOP - Doc. Copy Count, or NDHBDOCPRG - Doc. Page Range rights to control these settings.
Under Choose one, select Value.
In the Value box, type -1. This will remove the specified document right.
Click OK twice to return to the Override Table tab.
Although you have just created an override table, it is not active until it has been selected.
From the Active override table list, select your new override table and click OK.
The Restart BARR SpoolCore Service dialog box displays. Click Yes to restart the service. You must restart the service for your changes to take effect.

You can remove rights from documents sent to the spool from Print Utility. Complete the following steps to remove rights to documents when they enter the Spool Window.
Open Print Utility.
The procedure for configuring the document attribute values varies depending on if the files are being sent automatically or manually to the spool.
Automatically
– Select
the Automatic Spooling tab. Click
Add to create a new automatic
spooling folder or select a folder and click Modify |
Properties to modify the settings of an existing folder. The Spooling Properties dialog box displays.
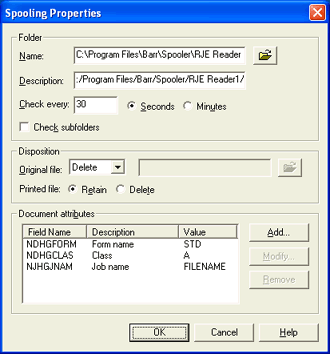
Manually – Select the Manual Spooling tab and click Settings. The Spooling Properties dialog box displays.
Under Document attributes, click Add. The Select Field dialog box displays.
From the Section drop-down list, select Data Set Header Internal Custom Section.
Select the appropriate document right field (for example, NDHBDOCDEL - Doc. Delete).
Next to Value, type -1 and select Decimal. This will remove the specified document right.
Click OK twice.
 Control files are useful for manual spooling. You can
save your settings to a control file and then use different control files
to spool different types of files. For more information about control
files, see the Working with control
files topic.
Control files are useful for manual spooling. You can
save your settings to a control file and then use different control files
to spool different types of files. For more information about control
files, see the Working with control
files topic.